
Last October I made a giant paper flower as a way to give a money gift to my friends Julia and Stefan’s wedding. You might have read about them here on the blog every once in a while as Julia and her hubby helped me set up my blog Craftify My Love in the early days. Why don’t you pay Julia’s food blog Chestnut & Sage a visit later on?
We received a very sophisticated wedding invitation in white and gold. The wonderful event was planned and took place in both a very laid back and super professional way and Markus and I enjoyed ourselves a lot! Bride and groom asked for money gifts as they already have a well-organized and functional household and love to travel.
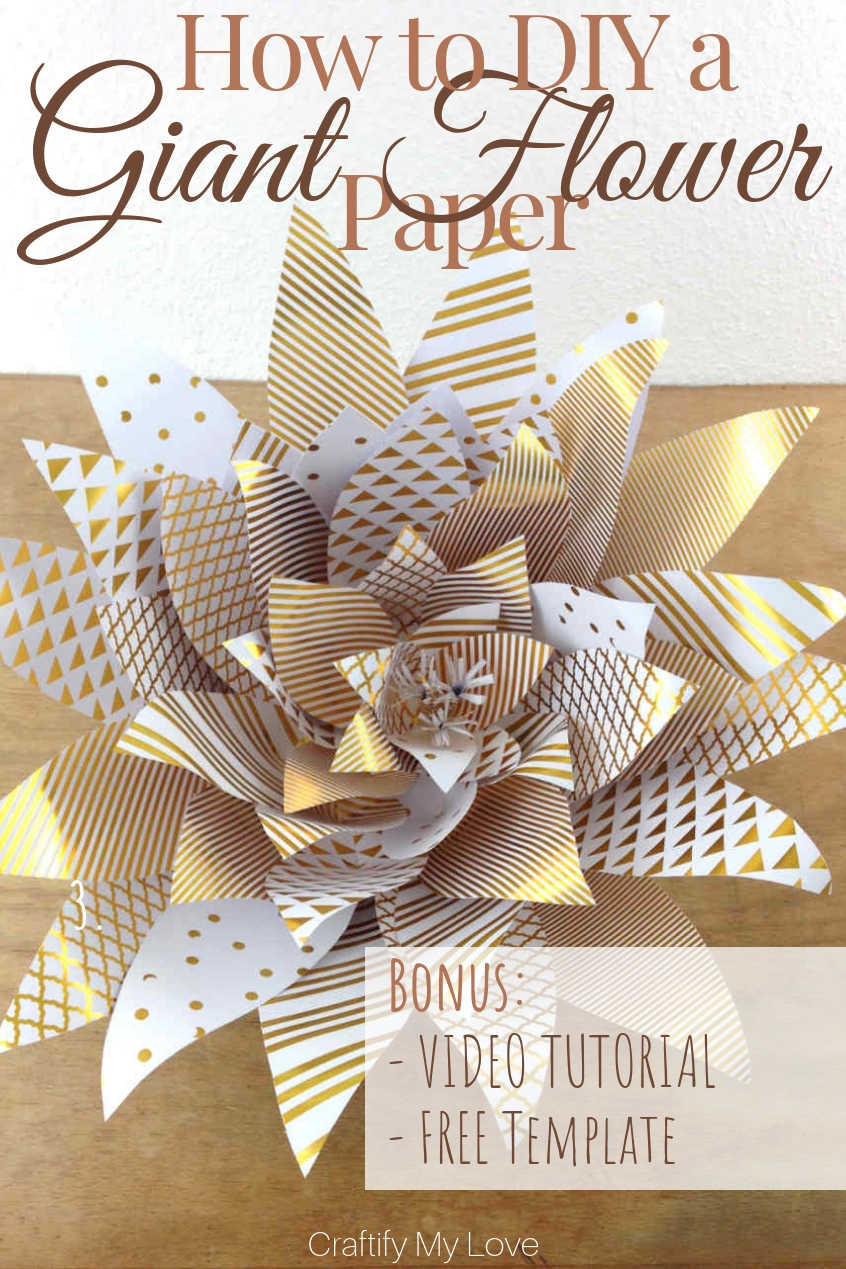
I wanted to make a giant paper flower in forever and felt the time had finally come. Over time I had built up a vision of my giant paper flower and how to DIY it and as I looked left and right in preparation on Pinterest I felt confirmed in my plans and knew that this would be a perfect project for Erlens monthly Pinterest Challenge Blog Hop. I made sure I had all the supplies at home aka I checked my giant stash a couple of days prior to the wedding for some white and gold paper.
Same as with this darling wedding or housewarming gift idea, I started to DIY the giant paper flower only a couple of hours before the wedding. Arghhhh…I am always super last-minute with my DIYs. But fear not. Everything worked out fine!
Big paper flowers might look intimidating, but are actually pretty easy to be made.
Keep on reading for a detailed step-by-step tutorial that even includes a video, and make sure to download the free template as a little thank you for subscribing to my newsletter.
Pinterest Challenge – Join in on the Fun!
The purpose of this Pinterest Challenge is to motivate all the participants of this hop (and you too) to not just pin, but to make it happen! You’ll see what my friends created this month at the end of this post.
I really enjoy this #pinterestchallenge! Look what I have been creating so far:
- IKEA Hack: Wood Slice Side Table
- DIY Stencilled Anthropologie Dresser Knock-off
- Crocheted Boho Hoop Earrings
- A Traditional German Housewarming Gift | Wood Burning Art
- Macramé Spiral Bracelet for Couples or BFF’s
Will you join in on the fun next month? Click here to sign-up ⇒ February Pinterest Challenge.
Supplies to DIY a Giant Paper Flower
This post contains affiliate links. That means if you make a purchase through these links, I may receive a small commission at no extra cost to you! You can click here to read my full disclosure.
- Cardstock or scrapbook paper (12 sheets of 12 x 12 ” or 30,5 x 30,5 cm)
- Free template for the petals
- Cardboard as a base (I recycled a shipping box) + circle template (I used a lid) + pencil
- Scissors
- Hot glue gun
- garden wire & pliers
How to make a Giant Paper Flower – Video Tutorial
If you are a visual learner like I am, you’ll probably prefer watching the video tutorial:
If you enjoy Video Tutorials, make sure to sign up to my YouTube channel HERE.
Related:
- How to make a Tiny Paper Rose
- Felt Flowers (start here for a series of 5) and Tassel Flowers are super easy to make, too.
- Other Flower Crafts by Me or by AllFreePaperCrafts.com you might like.
Step-by-Step Photo Tutorial: DIY Giant Paper Flowers
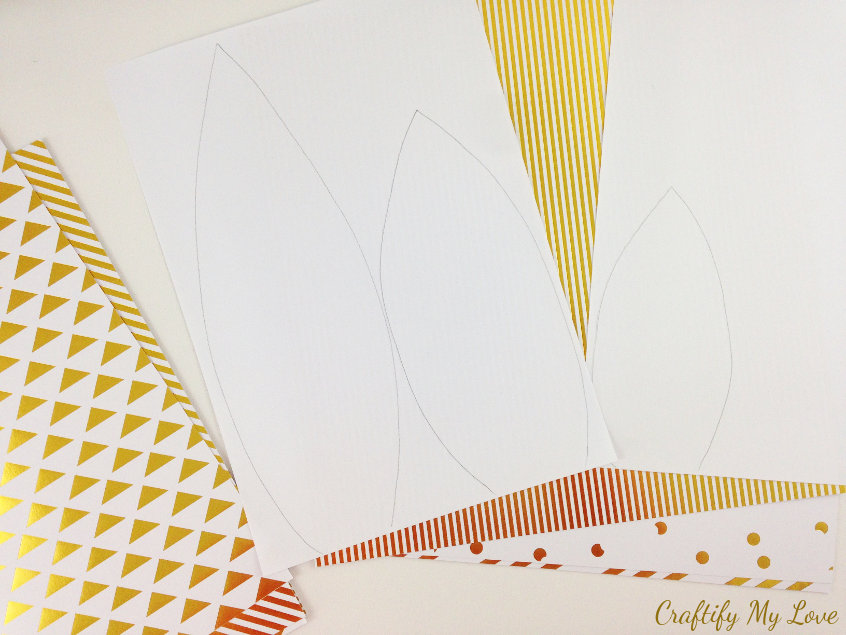
1 – Prepare the Petals
Download the free petals template HERE, print it and cut out the three different sizes. The medium and small templates are designed to get the most out of a 12 x 12 ” paper sheet.
I used 6 different patterns and had 2 sheets of each pattern.
Efficiency Tips:
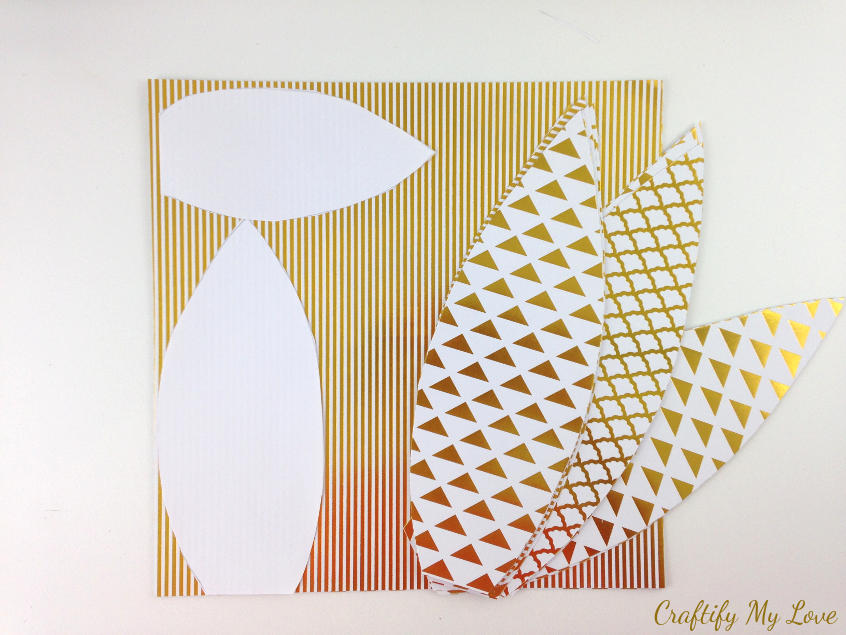
- Place three to five sheets of paper on top of another, trace or place the template on top and cut them all at once. Don’t freak if the edges aren’t perfect. They don’t need to be!
- You’ll find a nifty tip to make your life easier in this step in the video.
- Also, cut some more petals freehand from the paper scraps left when using the large template.
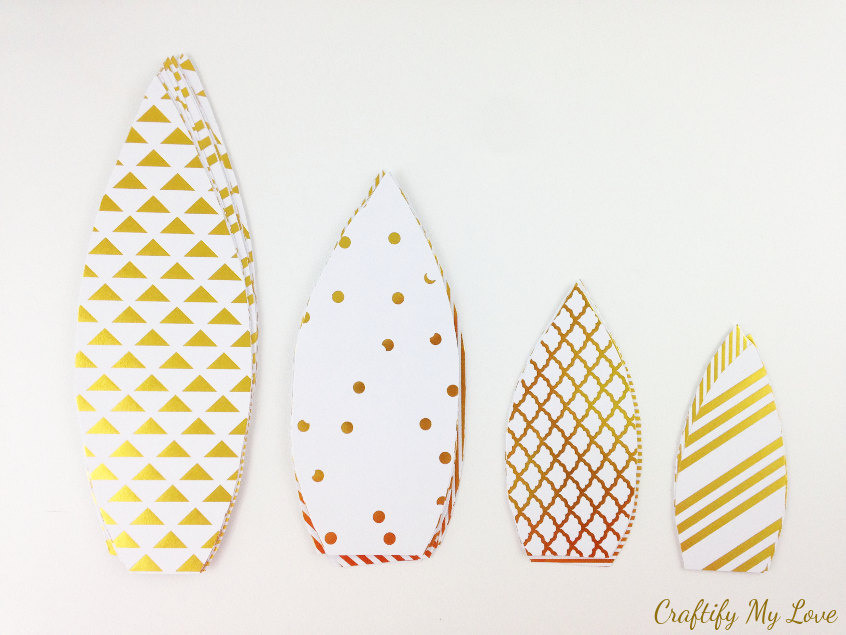
This way you’ll end up having four different sized flower petals.
Unfortunately, I didn’t count the petals I’ve cut out. Remember, I was kinda in a hurry to get to the wedding 😉 I tried counting them in the photo just now and I think you should be fine with about 50 petals. Spread them out somewhat evenly.
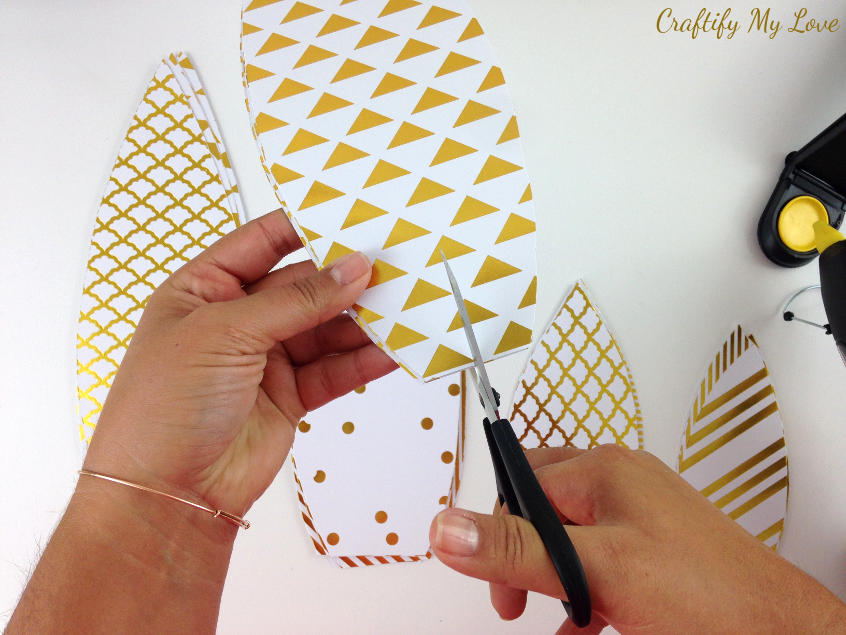
Now you’ll cut a slit into the base of every single petal. Again you can bundle them to save some time. See what number your scissors and your hand can handle. I was ok with 3 – 5.
Essential: The longer the cut, the steeper the angle of your petal. I’d recommend increasing the length of the cut the smaller your petals get. This way the petals on the outside of your flower will be flatter, giving the inner petals more room to stand up and shine. Does that make any sense?

Add a dab of hot glue on one side, and press the other side on top so the petal base is overlapping. By this, you are creating the first step for three-dimensional leaves for your giant paper flower. The second step will be done at the very end of this project.
2 – Build the Base & Holder of your Giant Paper Flower
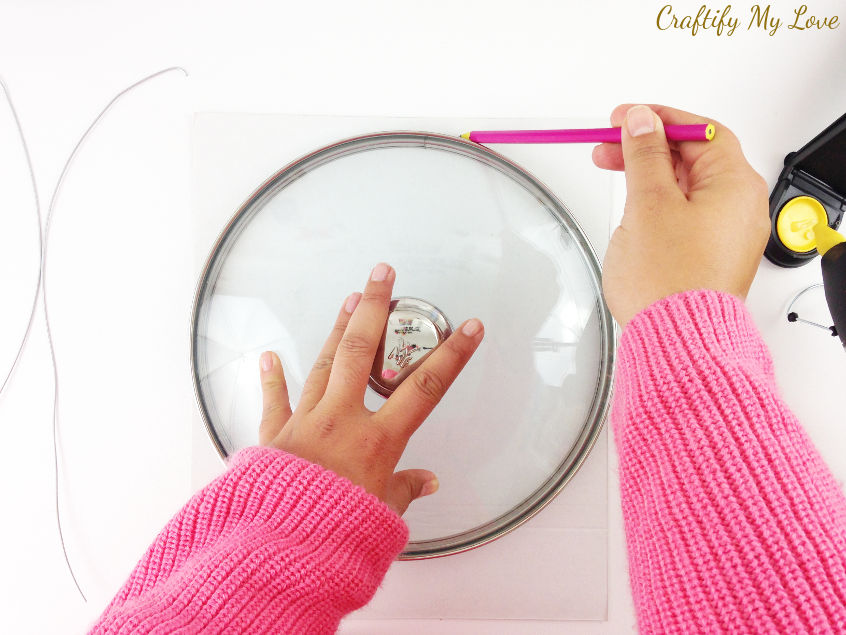
For more stability, you’ll give your giant paper flower now a sturdy base. Maybe you have a shipping box or any other cardboard at home you could recycle for this project?
Go grab a lid or any other round object you could use as a template and trace it on the cardboard.
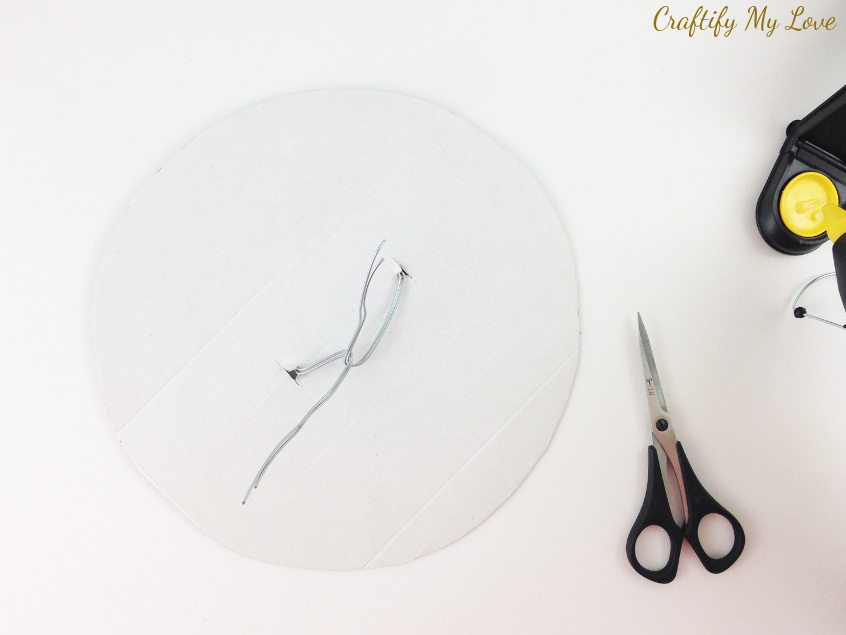
After you’ve created your circle base you’ll cut two holes in the center. Grab some garden wire and pliers and clip of a good length. I used the wire double for more stability.
Thread the wire through the previously made holes and twist it together. Voilà, you’ve created a holder to simply attach your DIY paper flower as a decorative element to any party location. Works even in trees and branches if you make the wire long enough!
3 – Now it’s time to Construct your Giant Paper Flower
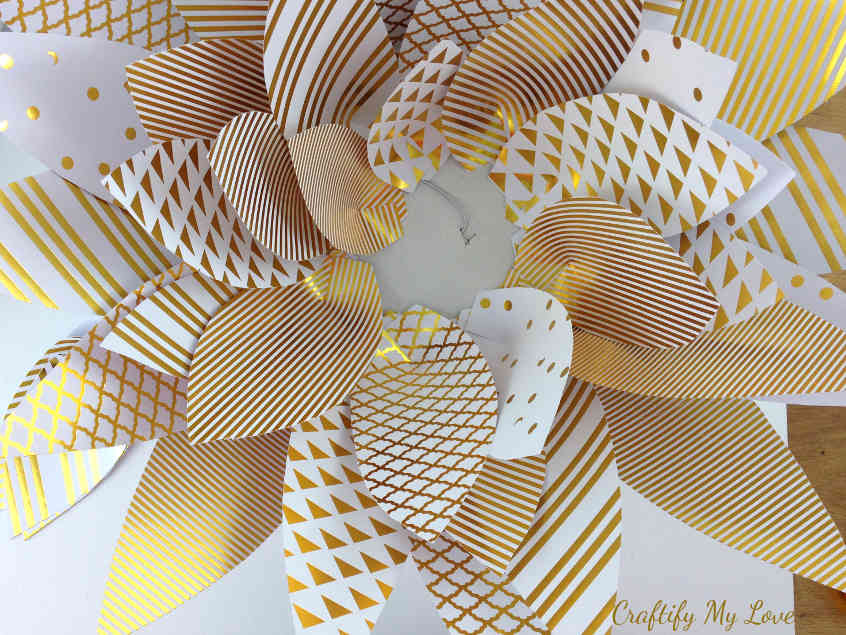
I recommend you start from the outside. Using your hot glue gun, add a petal at noon, three o’clock, six o’clock, and nine o’clock of your flowers base. Then add petals in between. For the next row place the petals so that they will be overlapping the ones from the previous row and so on and so forth. As soon as you run out of one size, start using the next.
I think you’ll get a better idea of this step when watching the video tutorial.
4 – Finishing Touches
A) How to make the center of your giant paper flower
Please make sure to watch the video tutorial to see how I’ve created the center of this darling giant paper flower. It is so much easier to see for yourself 🙂
B) The second step to a more realistic three-dimensional flower
Remember that we’ve created the overlapping part at the base of the flowers? Now it’s time to give a little TLC to the opposite sides of our petals. Use a pencil and carefully curl the pointy ends. Either towards the inside or the outside. I personally, like a mix of both.
Have you ever wanted to DIY a giant paper flower? Or 10? They make for an amazing photo backdrop for a wedding, a birthday, or baby shower. If so, start right now by downloading the FREE template for the petals HERE as a thank you for subscribing to my newsletter.
Love,

PS: Don’t forget to PIN this to Pinterest.
Now let’s see what other things Pinterest inspired! Head over and visit the other hosts to see what they crafted, cooked, built, or tried!

Erlene – My Pinterventures • Jenny – Cookies Coffee and Crafts
Debbee – Debbee’s Buzz • Laurie – My Husband Has Too Many Hobbies
Bri – Halfpint Design • Kelli – K’s Olympic Nest
Cherryl – Farm Girl Reformed
Beverly – Across the Boulevard • Debra – Shoppe No. 5
Roseann – This Autoimmune Life • Terri – Our Good Life
T’onna – Sew Crafty Crochet • Joanne – Our Unschooling Journey
Habiba – Craftify My Love • Gail – Purple Hues and Me
Kristie – Teadoddles • Lydia – Lydia’s Flexitarian Kitchen
Kristie – Love My Little Cottage
Michelle – Our Crafty Mom
Alexandra – Eye Love Knots • Marci – Stone Cottage Adventures
Ali – Home Crafts by Ali • Lauren – Mom Home Guide
Susan – Suzerspace • Audra – Renewed Projects
WOW! Your giant flower is awesome! Thank you for the step by step directions in both text and video! pinning -Marci @ Stone Cottage Adventures
Hi, my friend! You’re most welcome and thank you lots for the share.
It’s beautiful and amazing! You make it look so easy! Thanks for the amazing tutorial. What a wonderful wedding gift!
Jenny, it is really easy to make a giant paper flower. I often feel that big things are way easier to make than teeny tiny ones, lol.
I’ve always admired large paper flowers but have never made one myself. Your tutorial is so well done! Template, step by step instructions and a video too —thanks!
Debbee, thank you for your kind words. I’m sorry I just found your comment. It was hiding in the spam file…
This looks fabulous. I do love any kind of flower. This is a wonderful idea for so many occasions. Or just because.
You are so right, Debra. The next one will be just because I want one ?
That is so precious and beautiful ❤?
Thank you my dear friend ❤️?
Beautiful! So many ideas like welcome door “wreath” or decor for prom. And the color options…unlimited. You make it look so easy. Definitely pinning for later.
Kelli, it is so easy. Thank you for the share and those great other ideas. I never would have thought prom, as we don’t have them here in Germany.
What a cute an original idea for gift giving! I love it!! Pinned.
Thank you my dear.
I am a big fan of paper flowers – thanks for sharing the video and the,plate for this one. The papers you chose were unique and it came out great.
Thank you Susan. I love paper flowers, too, and had great fun putting the tutorial together.
This flower is sooooo beautiful! I love that gold paper! Gorgeous!
Thank you T’onna. I love that the gold shimmers with the light.
Georgeous! This would make a perfect centerpiece for guest tables at a wedding!
Yet another fabulous idea to make use of wonderful giant paper flowers. Thank you so much.
So pretty! A lot of the teachers here make huge tissue paper flowers for Cinco de Mayo . I never learned how, dad gum it. But this is a lovely alternative. At a librarians’ conference last year, participants were taught how to make really pretty little flowers from book pages. I have the one I made on my frig. Brought home the directions but never tried making one on my own. Need to make some for Valentine’s Day.
Leslie, I would love to know how you make those tiny paper flowers. I have a tutorial for little ones, too. Forgot to link to it ? maybe it’s the same way? Thank you for the insights into the ways over in the US. I always love reading those.
Great tutorial! The papers you’ve chosen are lovely! I’ve pinned this.
Hey Lydia, I’m glad you like it. Thank you so much for the share.
So so pretty, your paper choice is lovely your flower turned out great. What a fabulous pinterest challenge!
I totally agree. The challenge was fun and the results really made me happy. Thank you for taking the time to comment.
We both made paper flowers this time! Great minds think alike – haha! I’ll have to make one like this to go along with my rose. Pinned! : )
Hey, Kristie, I love that saying and I love your rose, too! As I have mine away I’ll have to recreate both eventually. But I bet it will look awesome.
I love these big flowers. So pretty for party decor and cheaper to DIY too!
Yes, I’m totally with you on both topics. Super fun & frugal to make. I am dreaming of a just because flower wall in my home, lol.