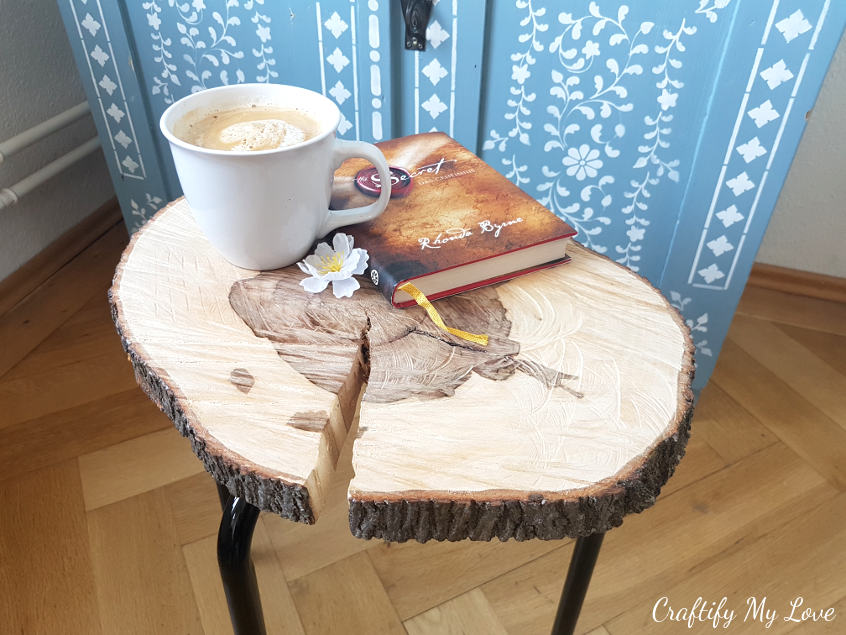
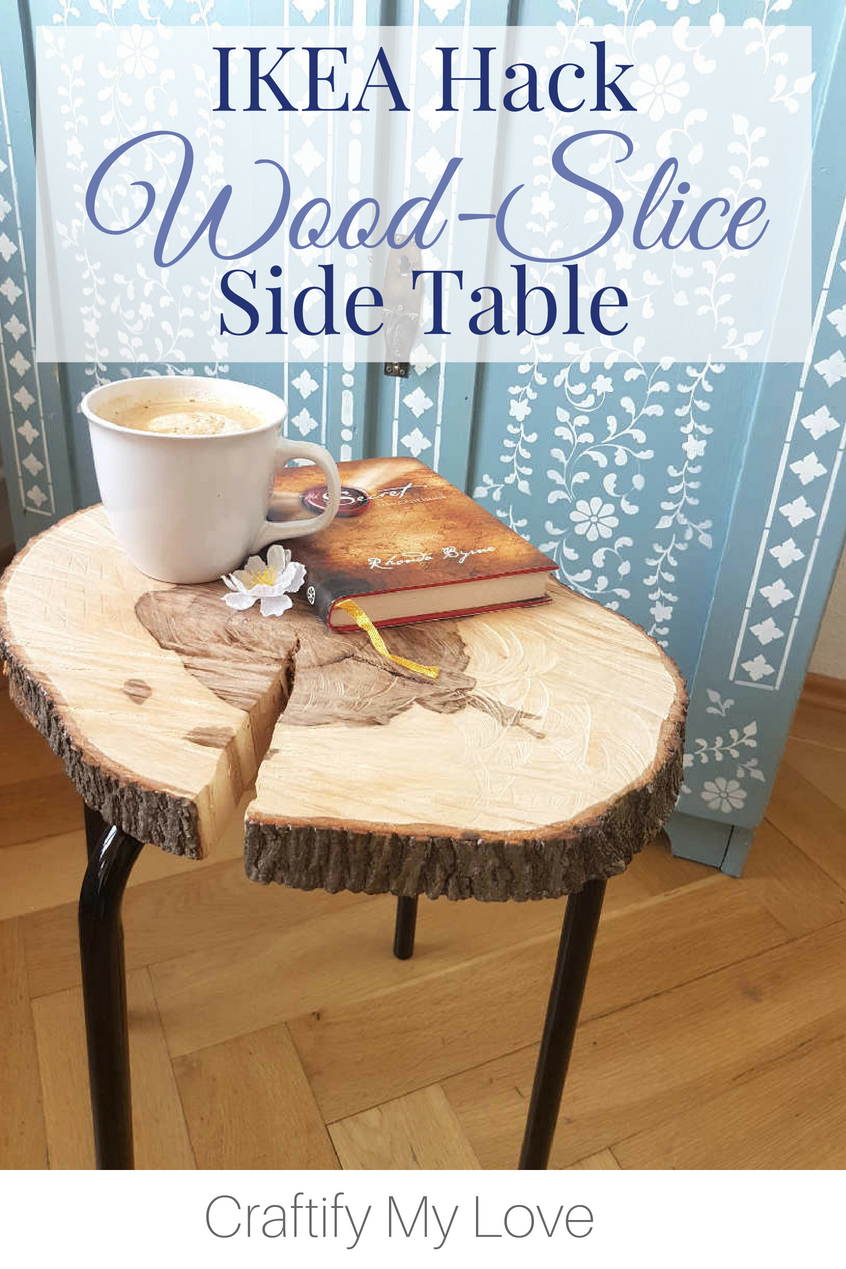
Today I am going to tell you a story that has a super sad beginning. But fear not! There is definitely a happy ending, namely this gorgeous wood slice side table I’ve made for my nature-loving brother Habib’s birthday.
Related: Read up on the tutorial of that baby blue floral dresser.
With this wood slice side table DIY, I am participating for the first time in my friend Erlene’s Pinterest Challenge Blog Hop. She is the amazing woman behind My Pinterventures. The purpose of this Pinterest Challenge is to motivate all the participants of this hop (and you, too) to not just PIN (and yes, I totally agree that it’s addictive), but to make it really happen!
My Inspiration for this DIY
Caroline from Burkatron made this impressive DIY tree slice hairpin table (PIN). I’ve pinned quite a view similar pins throughout the years, hers is merely the last one that brought my giant glass of wood slice DIY’s to overflow and got me to work, finally.
Plus the sad fact that my beloved, in the summer shade giving and good smelling basswood in front of my office window was cut down this winter. The fire inspector said it was in the way in case a fire truck needed to come to rescue people from our office building, so, unfortunately, it had to go.

This post contains affiliate links. That means if you make a purchase through these links, I may receive a small comission at no extra cost to you! You can click here to read my full disclosure.
Supplies for a Wood Slice Side Table
- Slice of Lumber (for possible resources, please see next paragraph)
- IKEA Marius Stool
- Clear Wood Wax
- 4 Wood Screws (Measure the width of your wood slice and add 2/3 of it to the width of IKEA Marius Stool legs.)
Tools
- Wax Brush (I simply use a dedicated paint brush for this step and store it in a zip-lock bag)
- Sand Paper
- Sander (my Grandma used to work for BOSCH, so I like to get their products out of sentimental reasons 😉
- Cordless Electric Drill (I wish I had this pink one, mine is yellow)
- Wood Plane (optional)
Where to Get Slices of Lumber for Your DIY Project
- Ask friends, family, or a neighbor that just cut down a tree.
- Check eBay, Etsy, Craigslist or local Facebook groups.
- Do you have a local lumber yard? Go ask there.
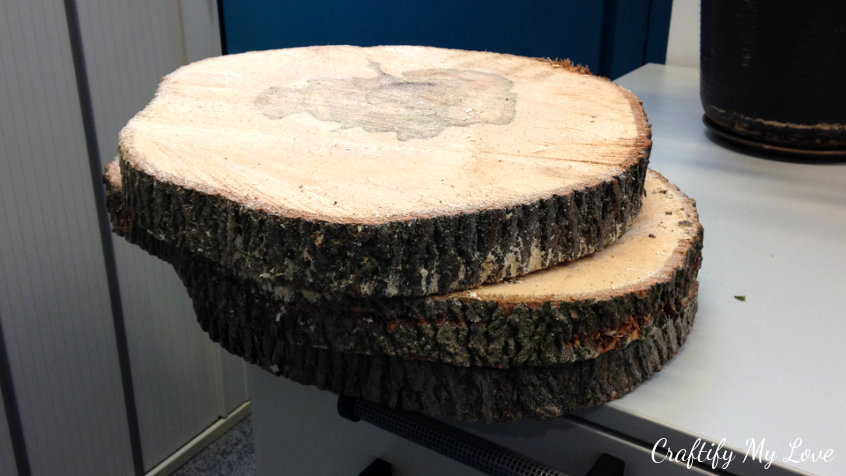
I wouldn’t be me if I didn’t try to find at least one positive thing to come out of this sad story. It didn’t take me long to decide that I needed some tree slices as a memento from my old buddy basswood.
Try to find the POSITIVE in any situation!
So, open the window I ripped and (almost screamed) asked the lumberjack for a view slices. He traded them for a cup of coffee to get warm again.
While drinking his coffee he told me how to dry the lumber slices in order for them to not crack.
How to dry lumber slices the correct way for DIY projects
The key is to let them dry very slow before working with them. I placed them in the cold attic (that’s what he told me would be best) and forgot about them.
But not for long, lol. My brother’s birthday was around the corner and he is a true nature boy. He loves everything outdoorsy and just moved into a new apartment.
I had my first project for these natural wood slices.
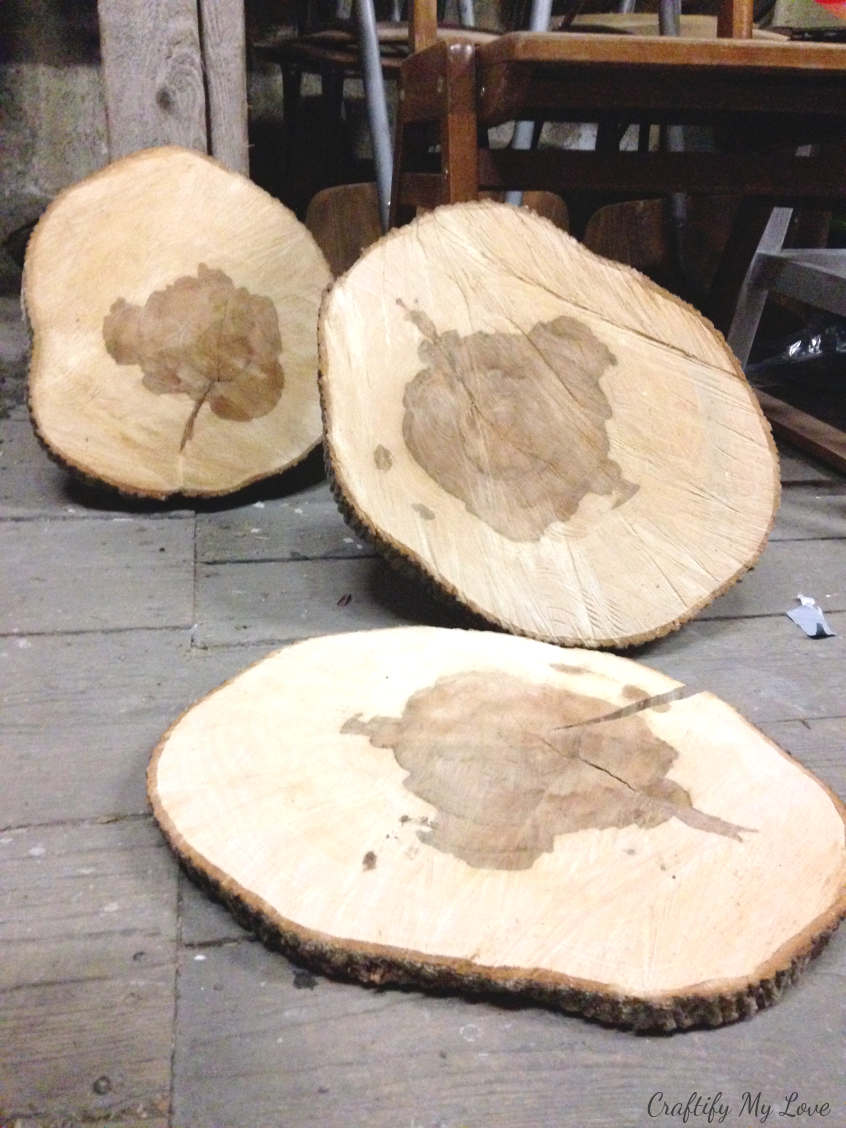
As I ran out of time, I took one wood slice down into the entryway of my apartment. There is no heating there so I figured my precious lumber slice would be fine, but it ripped anyways.
Again, I can appreciate the imperfect and simply made do with it. Can you?
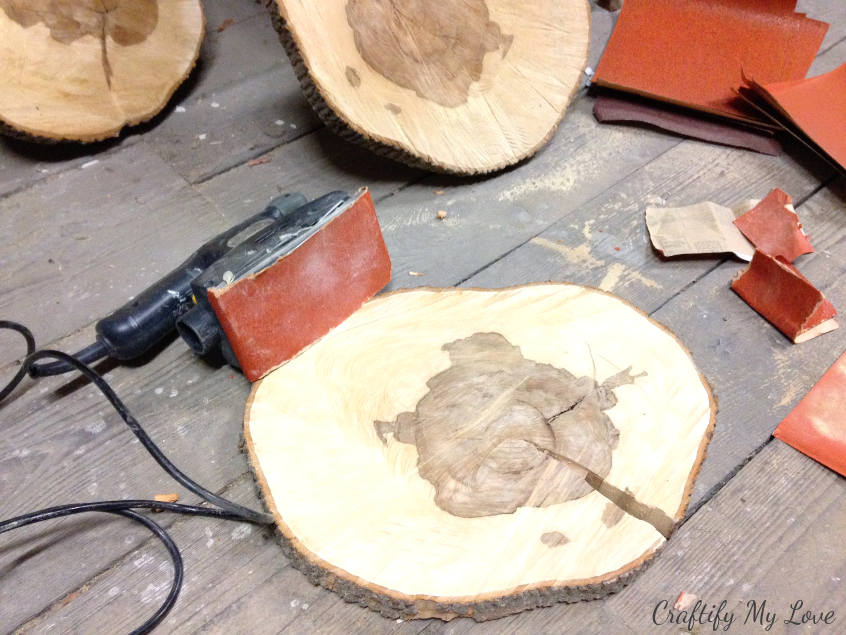
How to Prepare a Tree Slice Before Turning it into a Tabel Top?
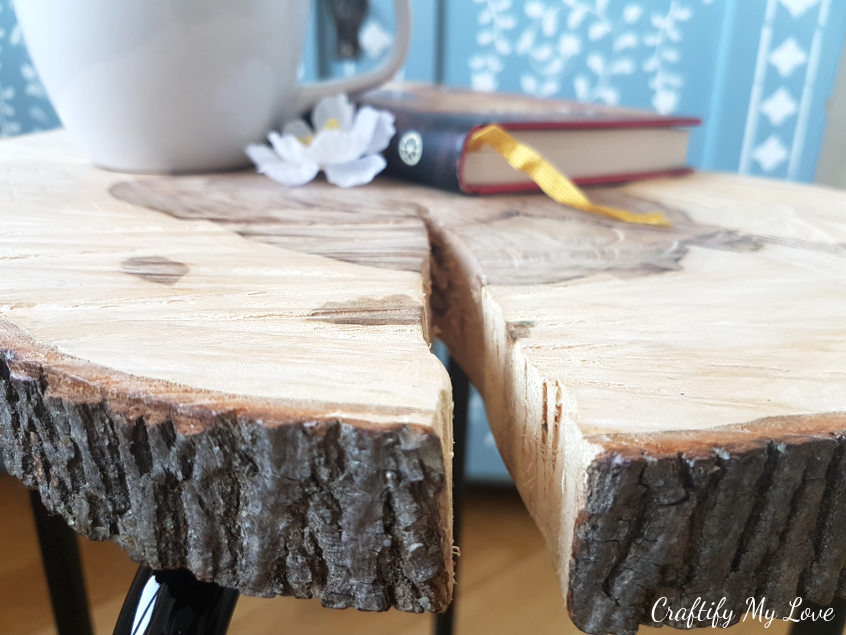
A chainsaw will leave a rough pattern in the wood (see the next image). So, you will have to decide if you want the surface to be super clean and even or if you even appreciate the texture.
If you want to even out the surface, use a wood plane. I didn’t have one at that time and I like the pattern. But now I do. Actually, I have two, keepsakes from my Dad who sadly can’t DIY anymore.
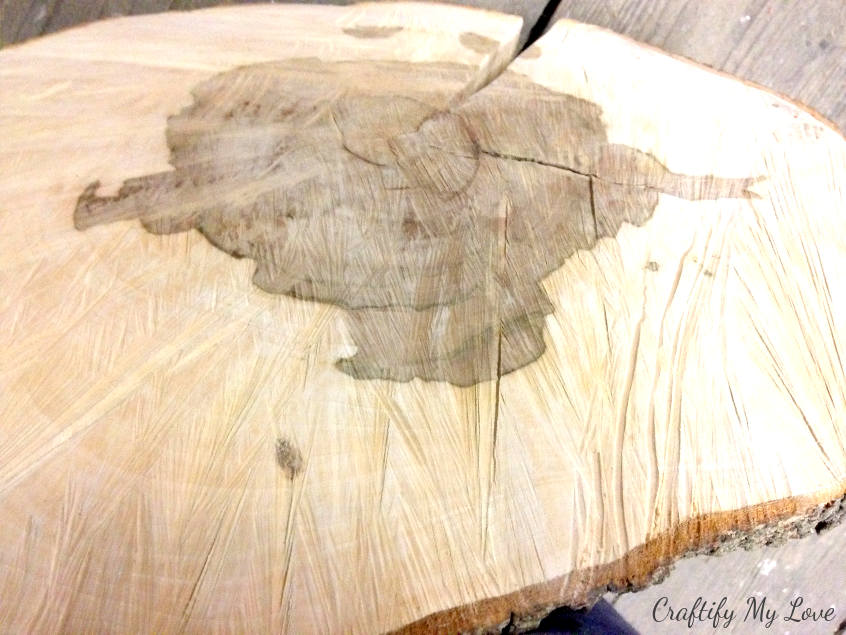
Use a sander (my next one will definitely have a dust collector/filter like this one) to get rid of all the splinters and make the entire slice smooth to the touch by manually sanding down the furrows.
Pay attention when you work around the edges as to not break the bark.
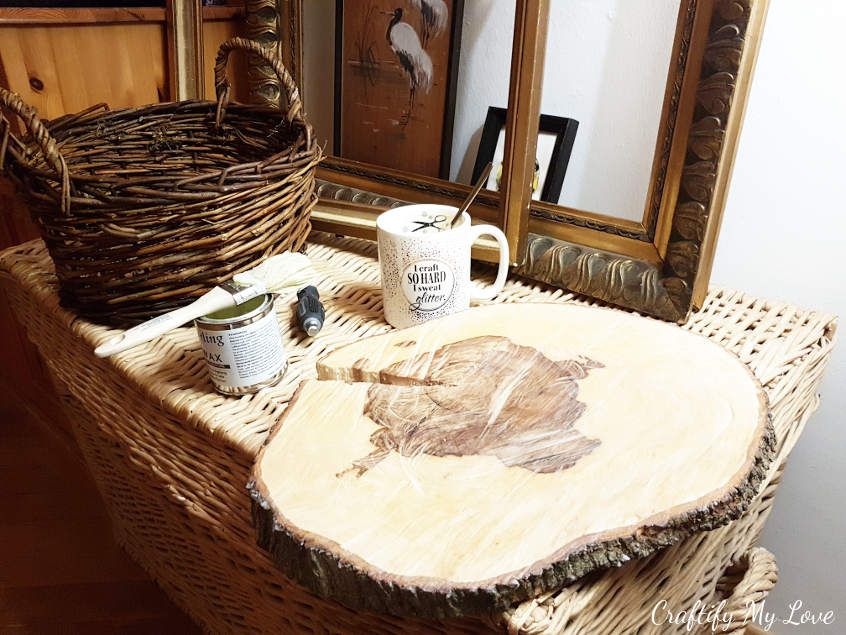
Sealing the Surface to Protect it from Water
Clean off all that sanding dust, break out a can of clear wood wax and a brush.
You want to be able to place hot beverages on top of your wood slice side table or wash it off if you’ve accidentally spilled something. This is why you will apply the wax to the top of your lumber slice. You can wax the bottom side, too, but that is not a must.
Frugal Tip:
Save a lot of time and effort by not cleaning your brush after you’ve used it with wax. Simply store it in a zip-lock back it will stay smooth and reusable for your next woodworking DIY project. This also prevents any oil residue to mix with your paint and cause the paint to not hold on tight to the wood.

Let the wax soak into the wood for a little while. I grabbed a cup of coffee and took some photos while doing so 😉 . Afterward, take any excess wax off with a soft cloth and let it dry for 24 hours.
I have been actually using Ann Sterling SOFT WAX from the UK for this project, but I haven’t been able to find it on Amazon.com for my American readers. You could try this one, though.
Adding Legs to Your Wood Slice Side Table
I really really do like the look of those 3-rod hairpin legs and eventually, I will make a side table for my own home with a set of these. But as time was scarce I drove to IKEA and bought the stool MARIUS to repurpose its legs.
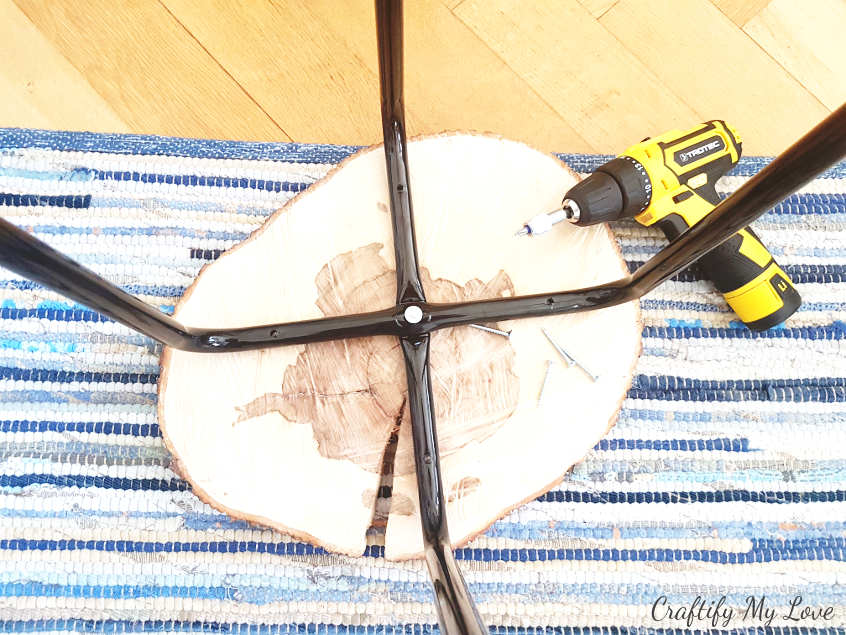
By adding the big blunt screw that comes in MARIUS’s package, you’ll fix those to individual parts together.
Place the legs upside down on your wood slice. Pay attention that the side you dedicated to being the top is facing downwards now. And mark where you’ll be drilling your screws.
In order to protect your wood from splintering, you can pre-drill the holes using your electric screwdriver.
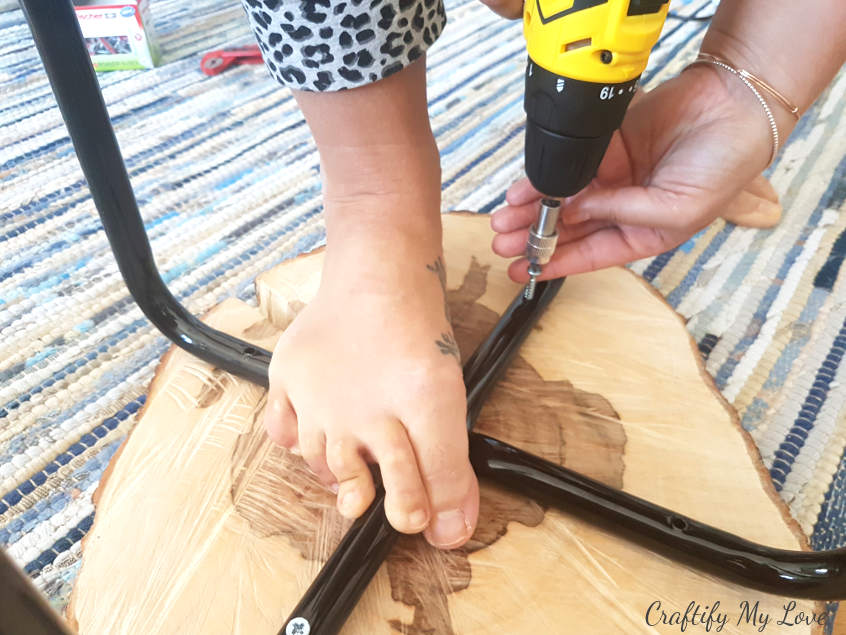
Safety first, you guys!!!
I recommend you ask someone for help to hold the legs in place, while you screw them to the lumber slice. This way you won’t have to work with your bare monkey feet (like I did).
Like the blue cabinet with the floral pattern in the back? Learn how to make one yourself here.
And there you have it!
A wonderful natural wood slice side table that you can recreate, too!
Now, scroll further down and find other Pinterest PIN’s that my friends actually recreated.
Love,

PS: Make sure to PIN this for later, if you want to make it later.
Related Woodwork DIY Projects:
Are you hungry for even more IKEA Hacks or basic woodcraft projects?
- IKEA Hack TARVA: Orientally inspired dresser
- IKEA Hack: Tufted Storage Ottoman
- Make Shelves from Old Drawers
- Anthropologie Faux Bone Inlay Knock-Off
- Or browse Favecrafts.com in their woodcraft section.

Are you ready to see what other things Pinterest inspired? Head over and visit the other hosts to see what they crafted, cooked, built, or tried!
I have participated quite a view times so far and am absolutely in love with this challenge.
- IKEA Hack: Wood Slice Side Table
- DIY Stencilled Anthropologie Dresser Knock-off
- Crocheted Boho Hoop Earrings
- A Traditional German Housewarming Gift | Wood Burning Art
- How To Make A Giant Paper Flower + Free Template
- Macramé Spiral Bracelet for Couples or BFF’s
Will you join in on the fun next month? #pinterestchallenge, click here to sign-up ⇒ July Pinterest Challenge.

Erlene – My Pinterventures • Lauren – Mom Home Guide
Debbee – Debbee’s Buzz • Laurie – My Husband Has Too Many Hobbies
Bri – Halfpint Design • Julie – Sum of their Stories
Lisa – Blogghetti • T’onna – Sew Crafty Crochet
Pili – My Sweet Things • Debra – Shoppe No. 5
Roseann – This Autoimmune Life • Terri – Our Good Life
Chelc – Inside The Fox Den
Leslie – Once Upon a Time & Happily Ever After
Kelley – Simply Inspired Meals • Joanne – Our Unschooling Journey
Jenny – Cookies Coffee and Crafts • Gail – Purple Hues and Me
Rebecca – Hello Central Avenue
Beverly – Across the Boulevard • Habiba – Craftify My Love
Kristie – Teadoddles • Shirley – Intelligent Domestications
Kelli – The Olympic Nest • Lydia – Lydia’s Flexitarian Kitchen
Michelle – Our Crafty Mom • Emily – Domestic Deadline
This is really neat and would be great in many settings, even on the patio. Thanks for sharing, great idea.
My pleasure, Kelley. I had fun making it and writing about it.
What a great project, and so well explained and illustrated. Pinned! Thinking of making one for my son’s loft apartment.
That would be great, Debbee! My brother really loves his so your son will probably, too.
What a wonderful table! It’s especially neat because you got to keep slices from a tree you enjoyed at one time. Pinning this for later reference!
That’s exactly what I thought! Thank you for sharing my friend.
That is really pretty and what a great way to honor a favorite tree. Pinned.
Thanks a ton! For your comment and share.
What a beautiful end table. I’m sorry you lost your tree but now you will have a piece of it forever. I bet your brother loves his gift. Thanks for a great tutorial
You’re most welcome, Jenny! And thank you for your kind thoughts.
I’m really lovin’ this DiY project. Would be awesome as a night stand or even as a side table on the porch. And…since my husband is a lumberjack getting a hold of a slice of wood shouldn’t be a problem. Great tutorial. Oh, and thanks for the tip about the wax brush. I had no idea.
Kelli, that is great. You’re st the source of wood slices of any size. You have to browse the web!!! There are soooooo many amazing ideas out there. My brush is in its zippy for more than 6 months now and it is just super handy that way.
This is fantastic. I will definitely need to look for a wood slice.
Yesssss, do that! Working with them is awesome.
WOW, gorgeous table! Great step by step, too. Pinning!
Thank you, Lisa. I try to show all my readers that these projects are all doable. And I feel that’s explained best when showing all the steps. It’s like breaking down a giant goal Ito many small ones, right?
Habiba! Such a precious gift you have made for your brother. It has so much meaning now to both of you. Can’t wait to see the one you make for yourself! Your tutorials are always fabulous! Laughing at your monkey feet comment!
Shirley, thank you so much for that thoughtful comment. My feet are my super power, lol. I use them so often for holding things down while crafting.
What a wonderful gift for your brother!
Hi Roseann, yes, he really liked it. I was glad.
So clever and you are so handy. Very impressive. Looks like something out of West Elm!
Oh wow! What a compliment. Had Todesdaten West elm real quick, though, lol. I hope I managed to show that it is actually pretty simple to make this and that no big skills are needed. I’d love for you to give it a try and if you need advice, just let me know.
What a thoughtful gift. I bet your brother loves his new natural wood table that you made for him. The next time I see someone cutting down a big tree, I’m going to see if they’ll cut me off some slabs.
Thank you, Erlene. Yes!!! He loves it. And that makes me happy. And I bet once you’re on the lookout, you’ll find wood slabs soon.
Really pretty. Gonna try this DIY project for our table. Thanks a lot.
I am glad you like it!
Love it. A bit of nature indoors!
Thank you Vicki. Just yesterday I met my brother again. He told me how much he loves his little nature table.
Whaaaaat!? These are super cute! I can’t wait to try these!