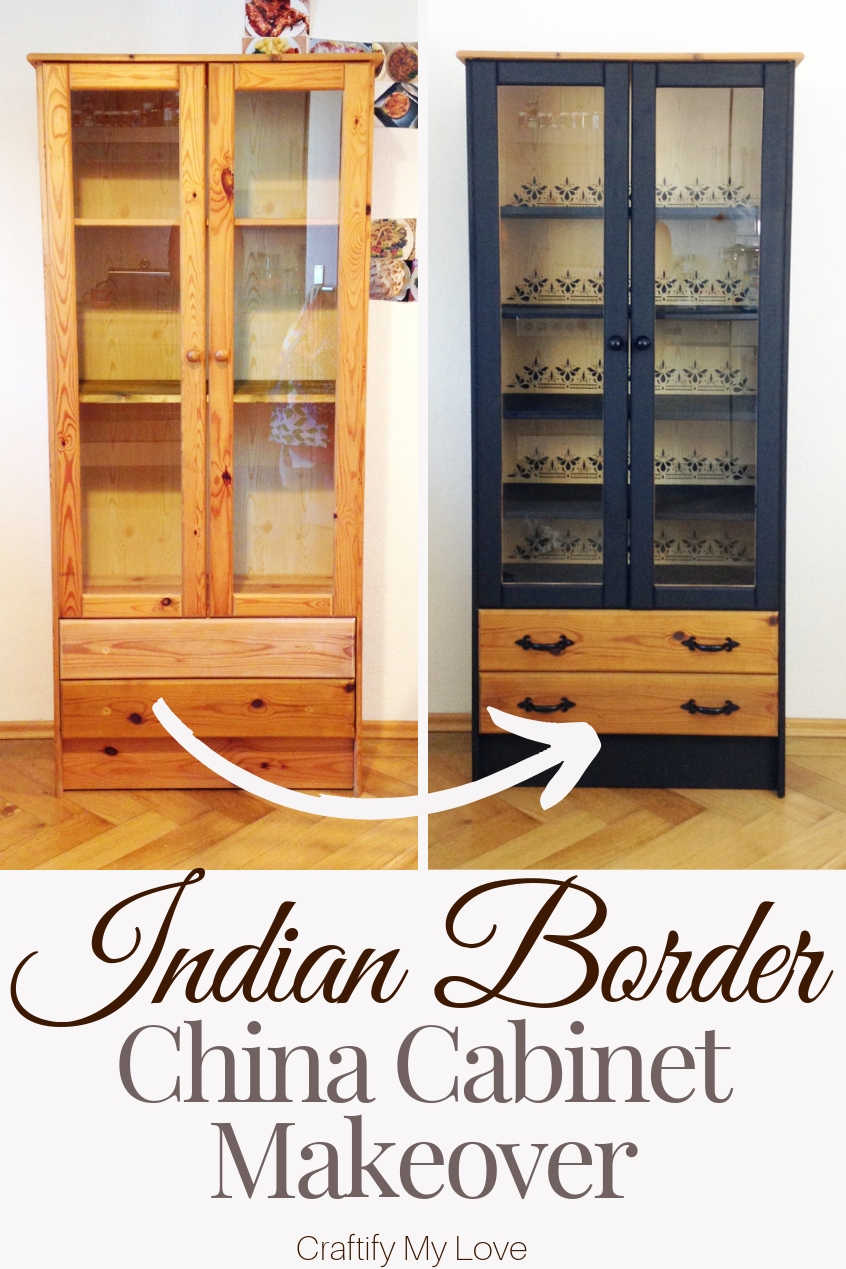
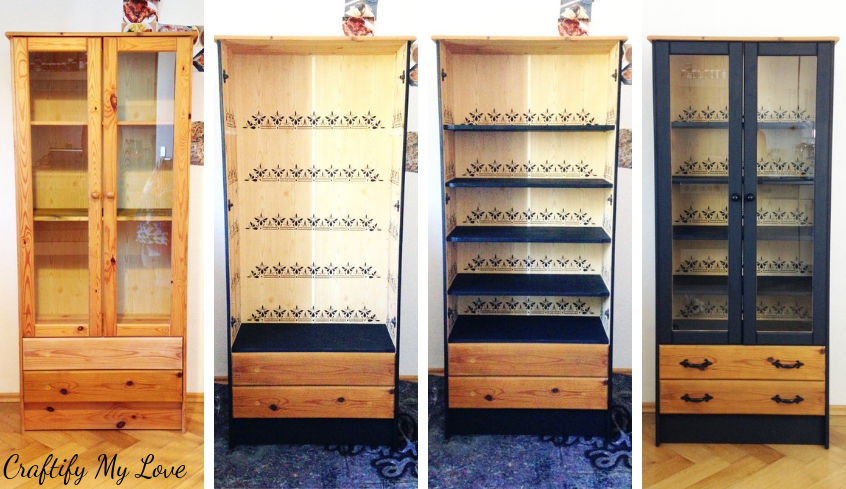
As part of my DIY kitchen update, I am currently working on, I want to share with you this Easy China Cabinet Makeover using a beautiful Indian or oriental border stencil and some paint.
I have to admit, I have a little obsession with mugs. Mostly, I get them as souvenirs on my various travels. Needles to say they don’t match, but that doesn’t matter to me. I love to be able to choose the mug for my morning tea by my current mood. I even have a GUINNES one from Dublin for those kind of days, lol. Can you relate?
Markus is a good man! He only rolls his eyes a little whenever I am bringing home a new bright and colourful mug. But he is always wondering aloud: “Wherever will we store this latest conquest of yours, dear?” I always assured him:
I’ll be creating a beautiful new storage for them. Trust me!
And this is what I did…as soon as I’ve found the perfect little china cabinet for free!
Thrift Store Challenge

The Rules:
- Upcycle an item(s) from a thrift store, resale store, or garage sale into a new piece of decor.
- There’s no monthly theme.
- There’s no budget to stick to.
Projects I have accomplished since I’ve joined this challenge:
- Coastal Air Plants Home Decor
- DIY Stenciled Anthropologie Dresser Knock-Off
- DIY Butterfly Catcher Costume
- Stenciled Wooden Storage Box
- DIY Red Suede Teardrop Earrings
- How to Make & Break In a New DIY Chalkboard
If you are into frugal crafts like I am but need more inspiration to join in on this thrifty challenge, check out CheapThriftyLiving.com
Meet the Hosts
Angela | Simply Beautiful By Angela – Meredith | Southbound Blog – Jenny | Cookies Coffee and Crafts – Angie | Grandma Creates – Gail | Purple Hues and Me – Michelle | Michelle Jame Designs – Lynne | My Family Thyme – Habiba | Craftify My Love – Marie | DIY Adulation – Kathleen | Our Hopeful Home – Michelle | Our Crafty Mom – Carmen | Living Letter Home – Ann | Duct Tape and Denim – Salvage Sister & Mister – Chas | Chas’ Crazy Creations
Also, make sure you follow our board on Pinterest for more upcycled decor inspiration!
Ok, I might have bent the rules a little…
…as in my personal case the item was a hand-me-down from my godmother when she moved into a much smaller house. But if I wouldn’t have rescued this cabinet, three old shelves minus the cabinet, the old picture frame, and the cute little basket, they all would have ended up in the trash.
As we all spent so many lovely days in her beautiful garden I collected and pressed beautiful flowers with the goal to make little keepsakes for every one of us, too.
3 Simple Steps: China Cabinet Transformation On A Budget
Supplies for Easy China Cabinet Makeover
This post contains affiliate links. That means if you make a purchase through these links, I may receive a small commission at no extra cost to you! You can click here to read my full disclosure.
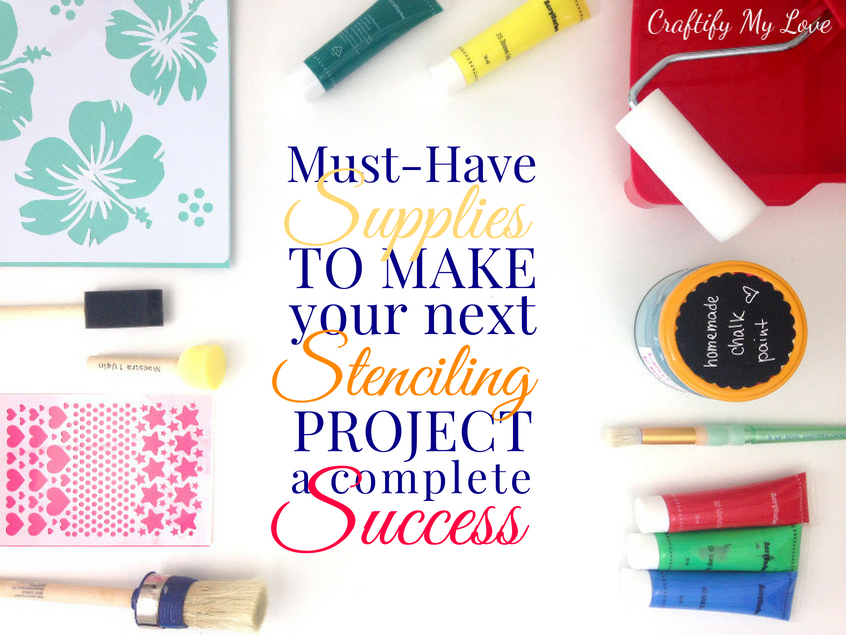
For the Stenciling:
- SAGAR Border Stencil by Dizzy Duck Designs (Etsy.com)
- Frog tape (Yes, it’s green and it works so much better than regular painters tape!)
- Black paint
- Brushes or foam roller, and a pouncer
- Wet wipes can be a life-saver (I always buy them in bulk as I use them for so many things!)
Find a Full Supplies List for your Stenciling Success HERE.
To Add Extra Shelves:
- Wood
- Jig saw and miter saw (or get them pre-cut by your local Home Depot or the likes)
- Sanding paper
- Pencil
New Hardware:
- Victorian Cast Iron Pull Handles and Knobs by YesterHomeUK (also bought off of Etsy.com)
- Drill and Screwdriver
Step-by-Step Directions for You to Follow Along
What I like to do before I start a furniture DIY is to sit down in front of my item and try to envision the outcome. Sometimes I make a little sketch, sometimes I don’t. This way I know what supplies I’ll be needing and what steps need to be done.
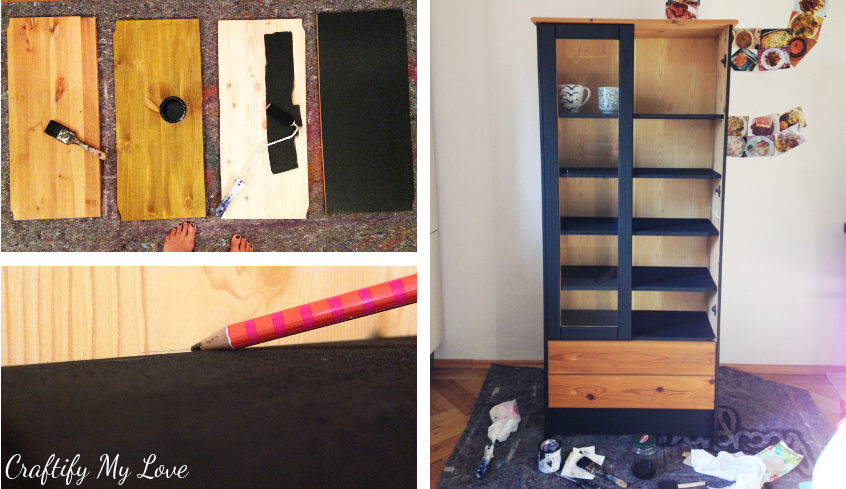
1 – Prep-Work and Painting
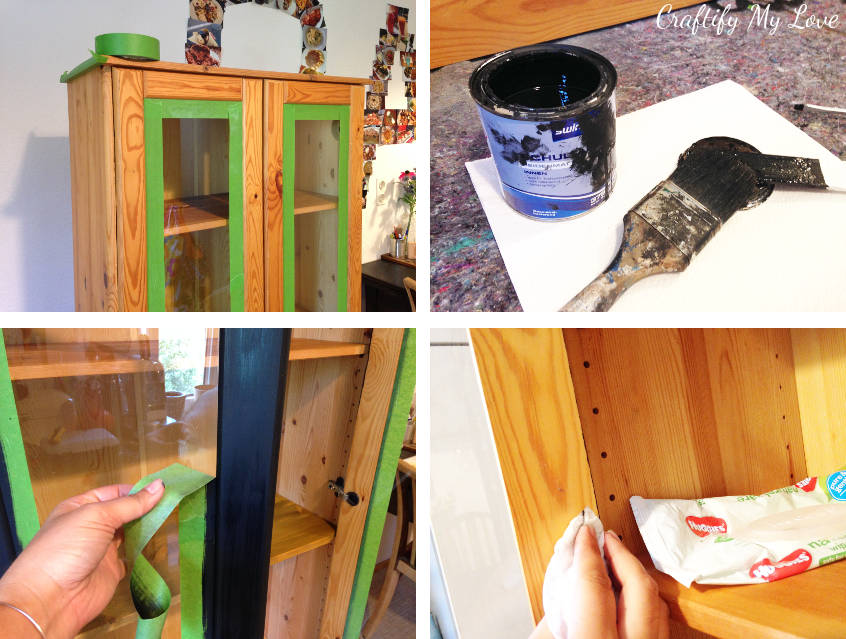
- Remove all the hardware.
- Protect the areas you don’t want to get paint on with frog tape.
- Stir the paint well.
- Paint the parts necessary of your easy china cabinet makeover.
- Remove the frog tape while the paint is still wet. This way you’ll have nicer edges!
Tip: Have a pack of wet wipes at hand. They are perfect for cleaning off little mishaps.
Little Touch-Ups For The Perfectionist In You
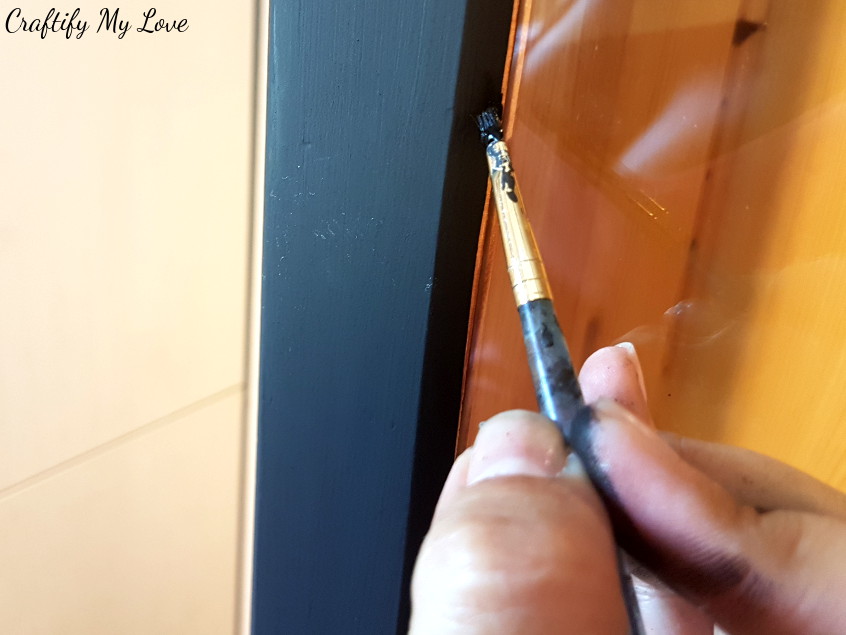
Now this is not a must, but if you find spots where you accidentally misplaced your frog tape, you can fix it! Use a very thin brush and a little paint.
Optional – Creating extra Storage Space by Adding More Shelves
I have a lot of mugs (and I plan on getting more) and I didn’t want to waste precious storage room. So I added two extra shelves to my china cabinet makeover.
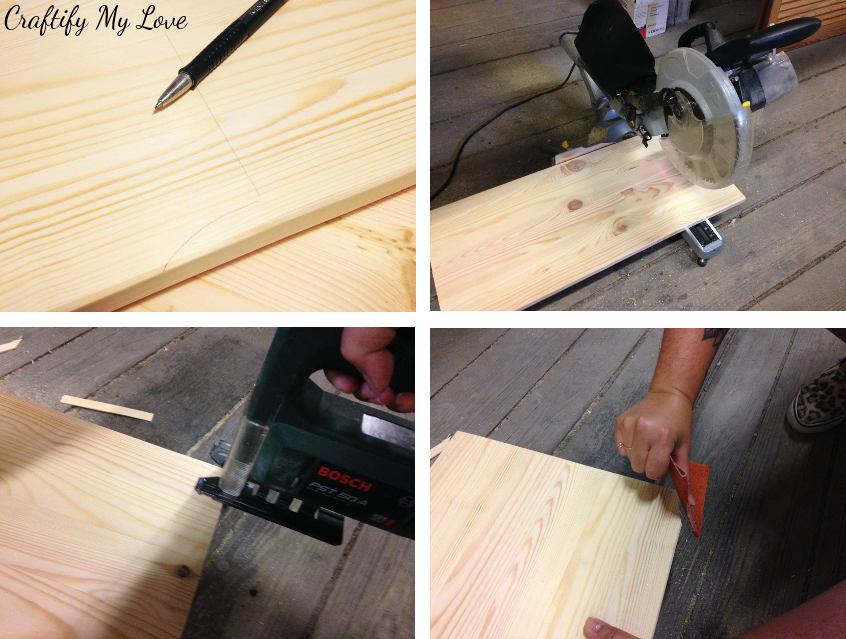
- Trace the shape of one of the wooden boards that came with your china cabinet.
- Cut your new shelf to length and recreate the shape so the new boards will fit into your kitchen cabinet.
- Lastly, sand the edges.
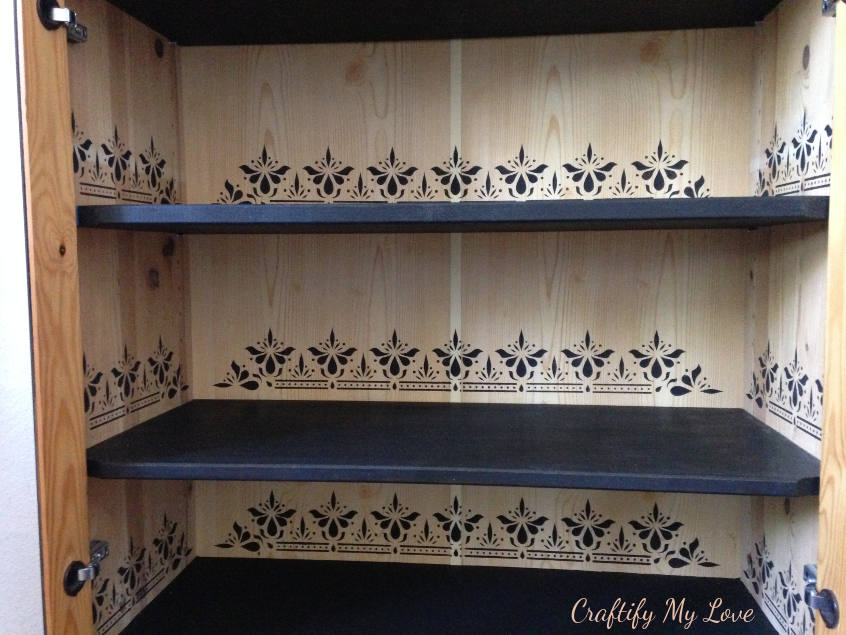
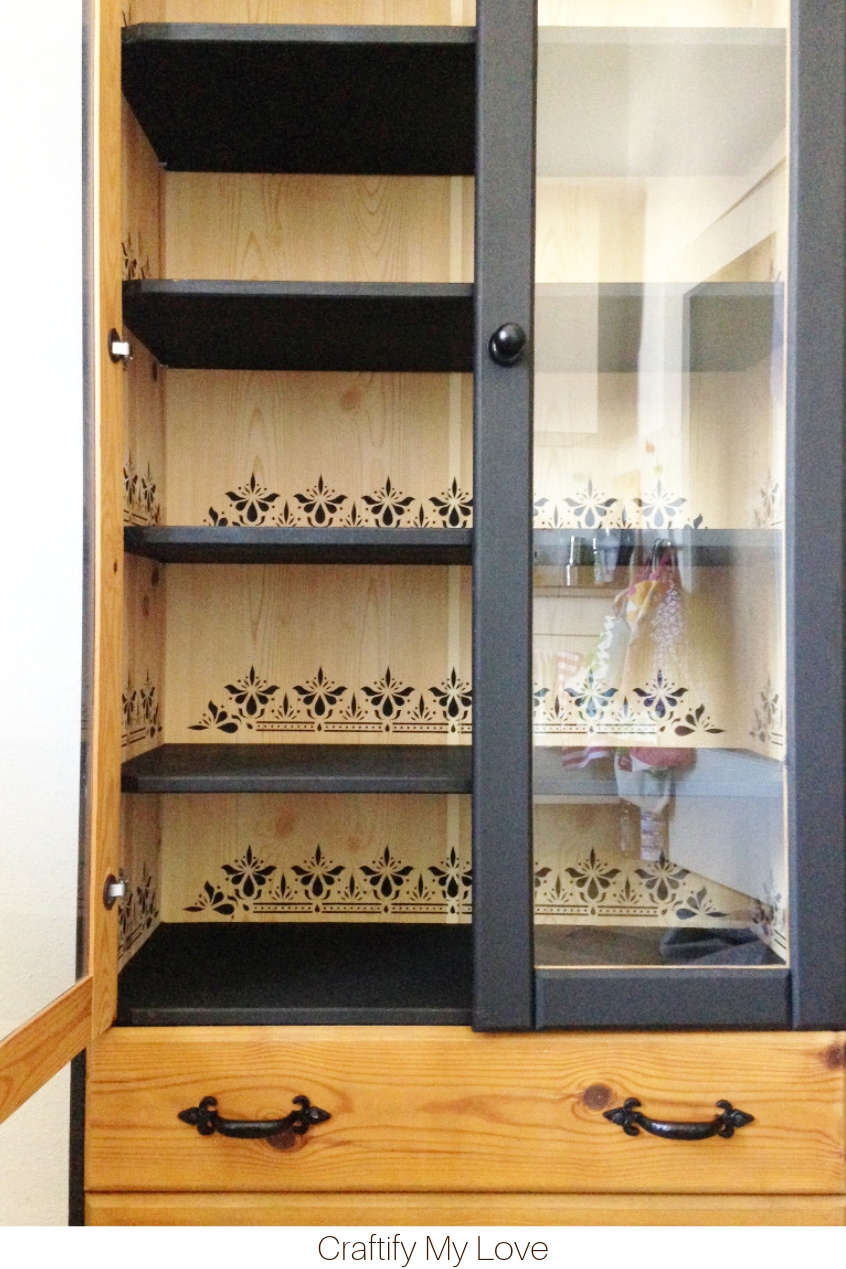
Painting the Shelves + Adding Stencil Lines
At first I tried staining the shelves but I didn’t like the look. So I ended up painting them the same black as my new china cabinets outside and glass doors.
To make your life easier while stenciling, you’ll want to insert the shelves temporarily now where you want them eventually to go (Tip: For a better idea add items you’ll want your cabinet to hold later on). Use a pencil and trace a thin line on top of each board.
Now you’ll know exactly where to place your stencil for the next step!
2 – How to Stencil Efficiently and Time Saving
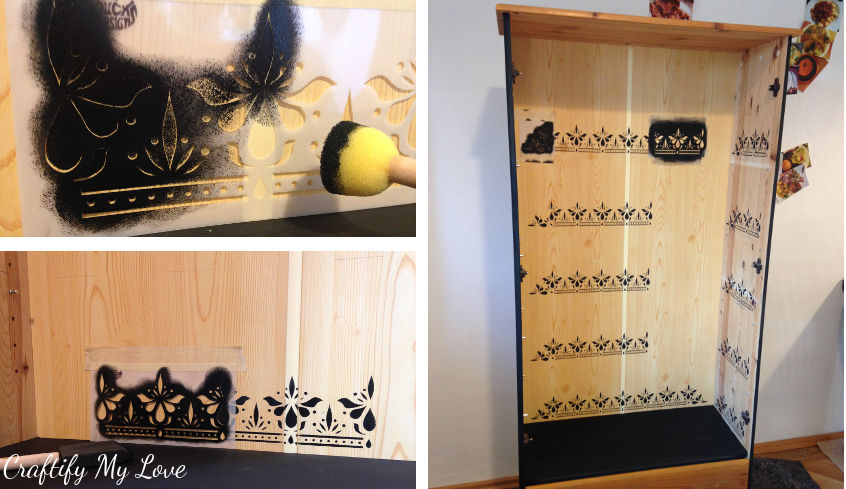
It’s probably easier for you to work inside the cabinet (especially at the sides), when you detach the glass doors beforehand.
Consider the following time-saving tips concerning drying time of your paint and if your stencil has a right and wrong side (most probably noticeable at the end of a border).
DIY-ing is even more fun if you work efficiently to save your precious time.
This is what you’ll do:
- Stencil all the parts first, where you’ll be using the right side of your stencil.
- Also, hop from one spot to another (in my case from the cabinets back to the sides), so you won’t have to stop stenciling while the paint is drying in other places.
- Clean your stencil with clear water and dab it dry using a kitchen towel.
- Now you can repeat your stenciling process using the wrong side.
If you are stenciling for the first time, Download my Free Guide To Stenciling Success HERE for FREE.
You’ll learn about all the Do’s and Don’ts so your First Stenciling Project will be a Guaranteed Success!
Related: Find other Stenciling Projects you might like HERE.
3 – Finishing Touches: Adding New Hardware
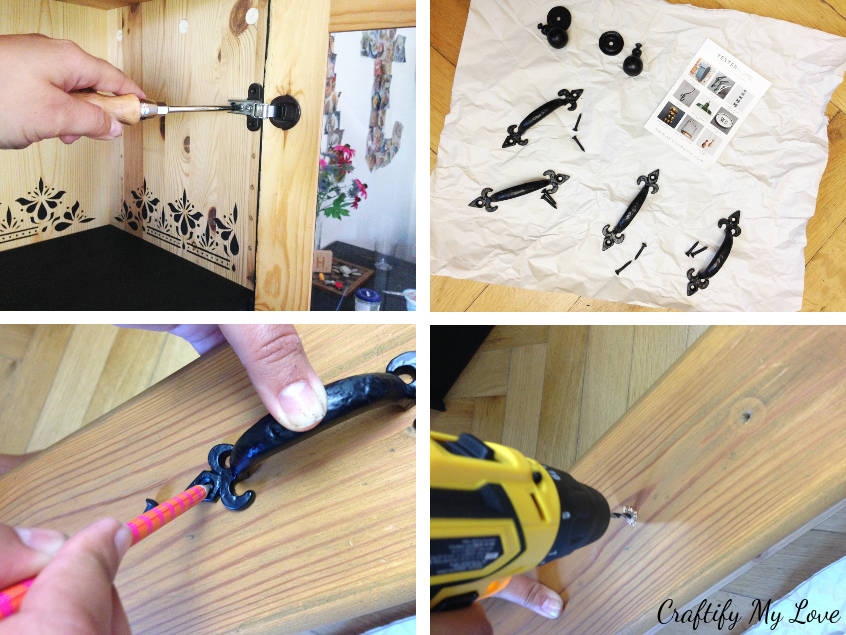
As my free little cabinet came with all wood knobs. I wanted to add more matching black cast iron hardware and found it on YesterHomeUK’s Etsy Store.
- Re-attach your china cabinets glass doors first.
- Measure and if necessary pre-drill new holes into your drawers or doors. This will make attaching your new hardware a lot easier.
- Add new hardware.
And, you’re done!
What do you say? I really like how my little china cabinet makeover turned out. It took me an afternoon to complete and Markus was happy as we now have a place for my ever-growing collection of mugs.
Frugal DIY Kitchen Update
Once the kitchen update – I am working on in forever – is done, I’ll share photos from my cabbie in action. Promise!
Here are the projects I have planed and already accomplished (or posted about):
- China Cabinet Makeover (this post)
- DIY Chalk Board
- DIY Succulents Planter
- Rustic Little Tea Shelf
- IKEA Hack: BEKVÄM
Can you tell I’m taking my sweet time? Lol. I like to NOT stress myself…
Love,

PS: Don’t forget to PIN this for later.
And now for more thrifty goodness!
What a fabulous makeover, Habib! I love the paint color you chose and your stenciling is perfect!
Thank you, dear! I have to admit, black is quite bold but used in little quantities, it is quite the looker.
This turned out gorgeous!! I love all the details and the extra storage for your mugs will be perfect!
Thank you, Angie. I’m glad you like it.
Habiba!!! (hear your name in my best Southern voice 😉 ) I LOVE it so much. The stencil you selected is so pretty. You are the stenciling queen my dear. What a transformation. Pinned it!!
Haha, Shirley, I can hear you say my name in your pretty southern style just right. And I’m loving it!!! Same as I love stencilling. It is such an affordable way to transform literally everything I go a unique piece.
What a transformation, great upcycle. Love the colors and the detail. Thanks for sharing.
You’re most welcome, Chas. I love what you can achieve with only a little paint and a stencil.
This transformation is amazing, Habiba! It doesn’t resemble the original piece at all! It’s absolutely fabulous! I bet your grandmother was completely surprised, pleased and happy all at the same time! Great job!
Awwww, Gail, you are too kind. Thank you for your lovely comment. Believe it or not, my godmother hasn’t seen the transformation yet. She doesn’t has a smartphone or email and she moved quite far away. I’ll make sure to bring her a pic once I visit her the next time.
This looks gorgeous. I love the shade of blue and the stencils. I prefer Frog Tape too, it works so much better. I can’t wait to see your kitchen when it’s finished. We are also in the middle of a kitchen makeover and someday it will be done, life happens. Collecting cute & fun coffee mugs is a must. lol I totally need a Guinness mug for those mornings
Habiba this is absolutely beautiful! I love the intricate design of the stencil, great job!