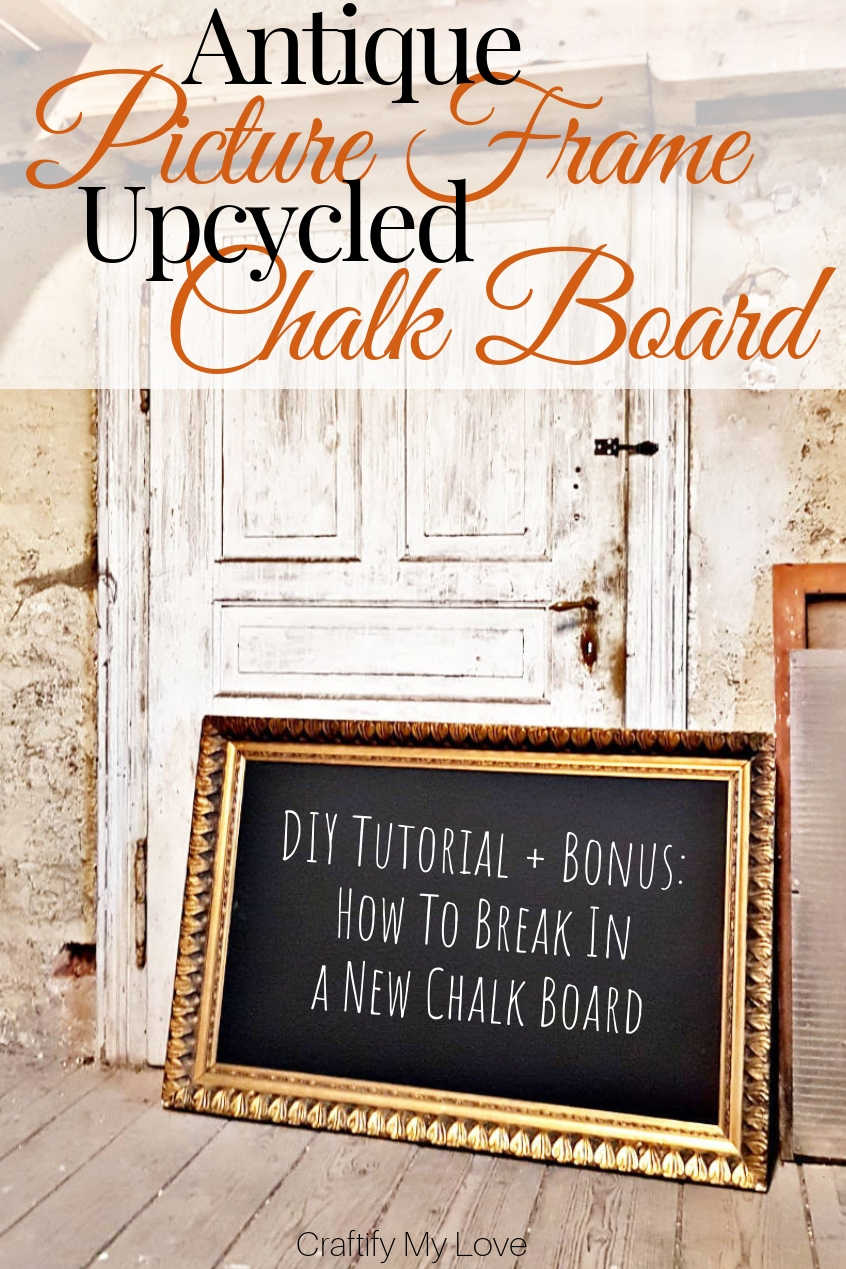
I love chalkboards as they are very versatile in home decor. Today I will show you how to DIY chalkboard from an antique frame and how to break in a new DIY chalkboard.
Seasoning a new chalkboard is super important! I learned this the hard way. But more on that further down in the post.
First I want to share the story of this beautiful antique frame with you. And before we can talk breaking in a chalkboard, we’ll need to be making said chalkboard from an old picture frame first, right?
Kitchen Update – Work in Progress
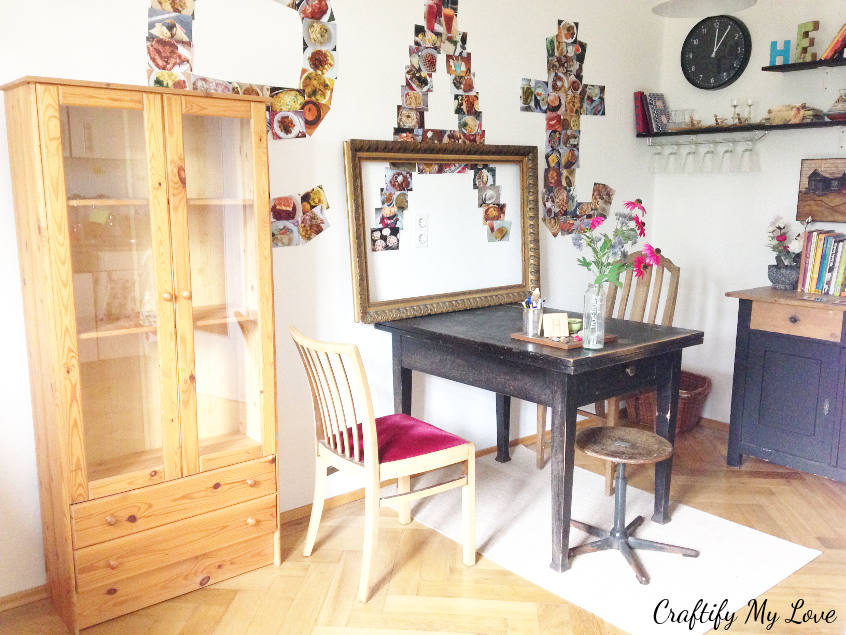
I am working on a kitchen update since forever. I get sidetracked so easily and always have millions of DIY projects going on at the same time. My kitchen – or rather my little dining are – went through a remodel once before (check out the BEFORE, the AFTER, and a little ADDITION over time).
It’s time to change things up a little.
Here are the projects I have planed and already accomplished (or posted about):
- China Cabinet Makeover
- DIY Chalk Board (this post)
- DIY Succulents Planter
- Rustic Little Tea Shelf
- IKEA Hack: BEKVÄM
When my godmother moved into a much smaller house she gifted me with many things. Among them several pieces of furniture from her living spaces, including the cabinet to the left. See how I transformed this little beaut of a china cabinet makeover HERE). While there I picked some flowers in her garden to make these darling keepsake wooden pendants.
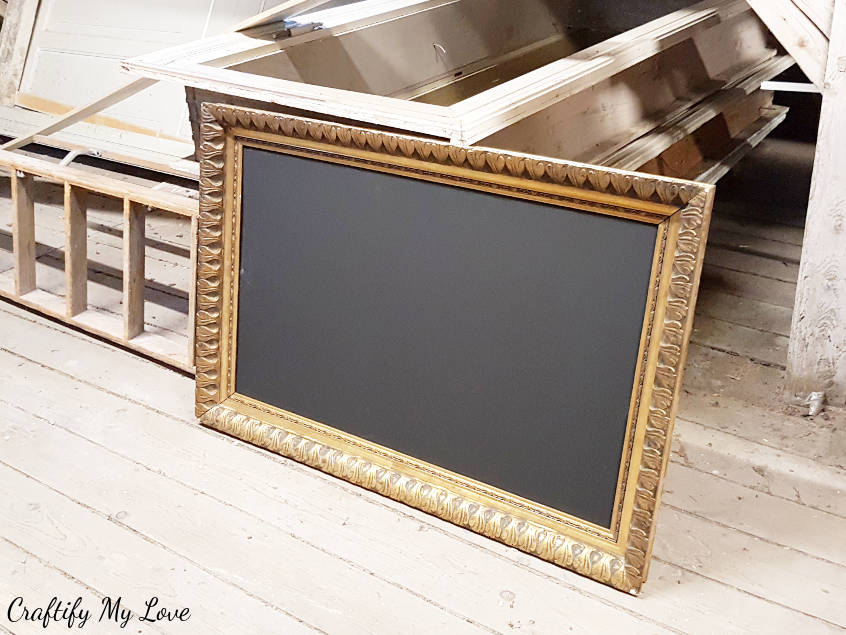
Rummaging through her basement & attic was pure bliss. I found a darling little basket I use to decorate my front door, rescued cute little drawers and turned them into shelves, and this super impressive massive antique picture frame. I knew right away that it would be gifted with a second life as a wonderful DIY chalkboard.
Thrift Store Challenge
As the upcycled picture frame came from sort of a garage sale (only that I had to pay zero bucks for it, lol), I thought it quite matching to share this tutorial as part of the monthly Thrift Store Challenge.

The Rules:
- Upcycle an item(s) from a thrift store, resale store, or garage sale into a new piece of decor.
- There’s no monthly theme.
- There’s no budget to stick to.
Meet the Hosts
Angela | Simply Beautiful By Angela – Jenny | Cookies Coffee and Crafts – Heather | Glitter On A Dime – Amanda | Domestically Creative – Denise | My Thrifty House – Molly | Just a Little Creativity – Angie | Flippin Fanchers – Victoria | Dazzle While Frazzled – Debra | Shoppe No 5 – Marie | The Inspiration Vault – Deborah | Salvage Sister & Mister – Pili | My Sweet Things – Carmen | Living Letter Home – Habiba | Craftify My Love – Emy | Semigloss Design – Meredith | Southbound Blog
Make sure you follow our board on Pinterest for more upcycled decor inspiration!
Projects I have accomplished since I’ve joined this challenge:
- Coastal Air Plants Home Decor
- DIY Stenciled Anthropologie Dresser Knock-Off
- DIY Butterfly Catcher Costume
- Stenciled Wooden Storage Box
- DIY Red Suede Teardrop Earrings
If you are into frugal crafts like I am but need more inspiration to join in on this thrifty challenge, check out CheapThriftyLiving.com
Supplies to DIY a Chalkboard from an Antique Frame
This post contains affiliate links. That means if you make a purchase through these links, I may receive a small commission at no extra cost to you! You can click here to read my full disclosure.
- Picture frame (I found mine in a dusty attic, but there are so many treasures to be found in thrift stores)
- Plywood (I hope this is the right term? I went to my local DIY shop and found a very thin wooden board, the surface was smooth)
- Chalkboard paint in black (Have you tried the chalkboard finish spray before? I haven’t!)
- Foam paint roller
- Drop cloth (I am super sad that we don’t have canvas drop cloth here in Germany as you guys do in the US. That would be wonderful to DIY with.)
- Pliers
- Nailgun or alternatively nails and a hammer
- Chalk (for the seasoning)
3 Easy Steps to DIY a Chalkboard Using a Recycled Picture Frame
1 – Buy, Cut to Size, and Paint the Wooden Base
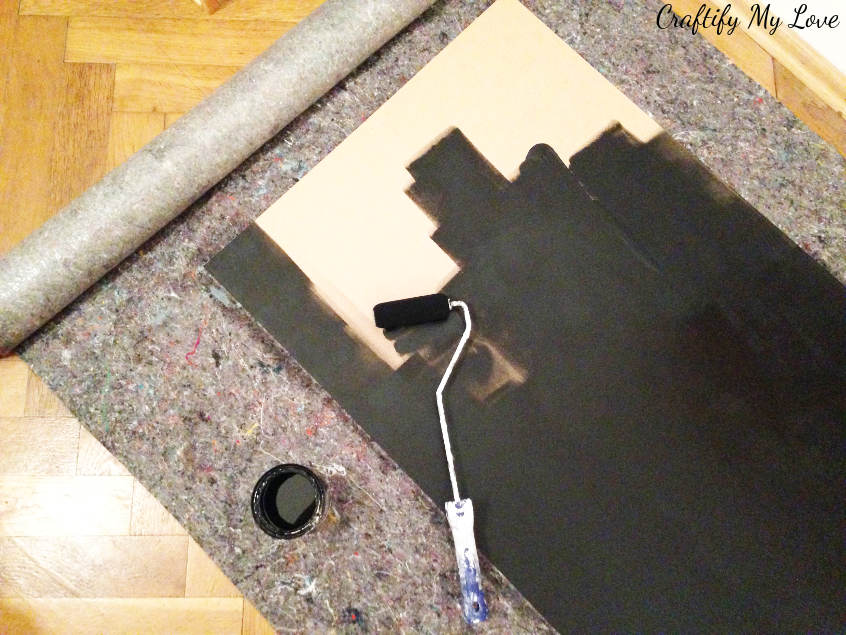
Make sure to get the measurements of the inside of the back of your frame. It will be bigger than what is visible from the front. You can get your board cut to size at your local DIY store for little or no money if you don’t own a saw to do so yourself.
I bought a very thin wooden board at our German equivalent to Home Depot. I made sure to get one with a smooth surface so I am not sure if plywood is the right term. Can you help with the translation?
Tip: Chalkboard paint is a pain in the behind when it comes to cleaning it off of brushes, foam paint rollers, and painters trays. As I don’t care for this job I do the following:
- I pour the paint directly on the wooden board and use a foam paint roller to spread the paint evenly.
- If my board needs several coats, I place the foam roller in a plastic bag and twist the opening shut tightly. This way the paint on the foam roller won’t dry and you can re-use it for the second coat.
- Once I am happy with the coverage (I think I only had to do one coat for this project – YAY!) I simply say goodbye to the foam paint roller and put it in the trash. Only the refill roll, though – you’ll hold on to the handle!
2 – Preparing your Picture Frame
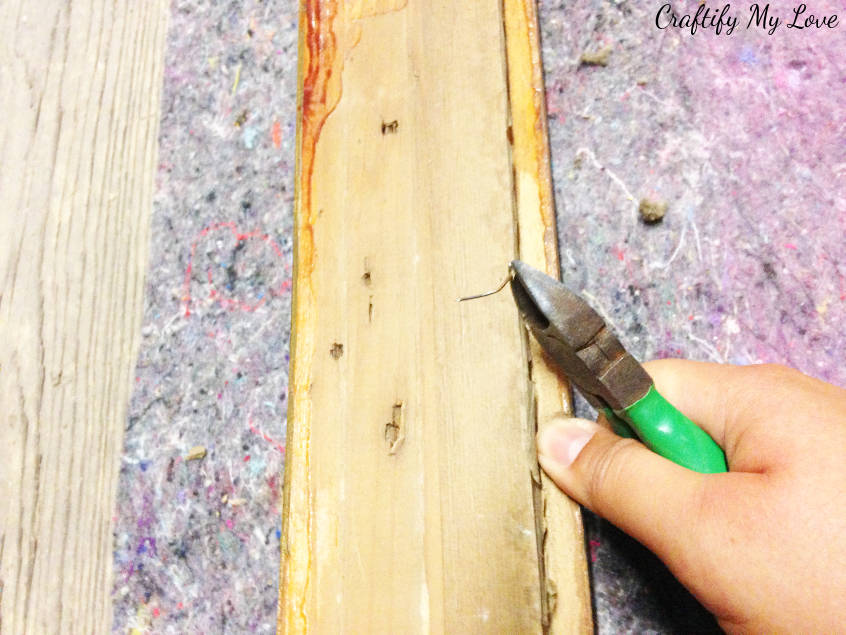
For time efficiency this step is best done while your paint dries.
In order to protect the front of your frame from scratches while you prepare the back, you should place it on a soft surface. I used a drop cloth for this.
If you scored an old picture frame at the thrift store or a garage sale and it still has the glass and backing, it’s time to remove it now. Mine didn’t, so all that was left to do was to remove any old nails (and there were a lot of them!) that were poking out of it with my trusted pliers and removing the dust. I used a damp cloth to do so.
3 – Install the Previously Painted Board to the Empty Picture Frame
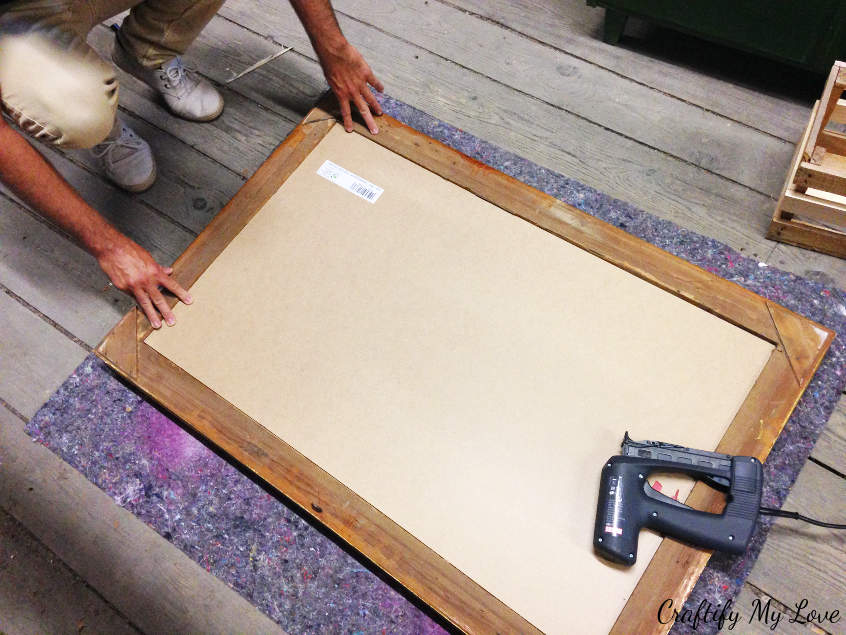
Markus gifted me with this nailgun that day and was eager to try it out himself. He usually isn’t into DIYing, so enjoy the rare image of him being my partner in crime, lol.
Place your previously painted chalkboard upside down into the empty frame. If you got your measurements right, it will slide right in.
Grab your nailer and fix the board to the frame.
Tip: Take a close look to the front of your frame and consider the length of your nails. Can you easily shoot them in vertically or do you need to apply them with an angel? You don’t want them poking out in the front, do you?
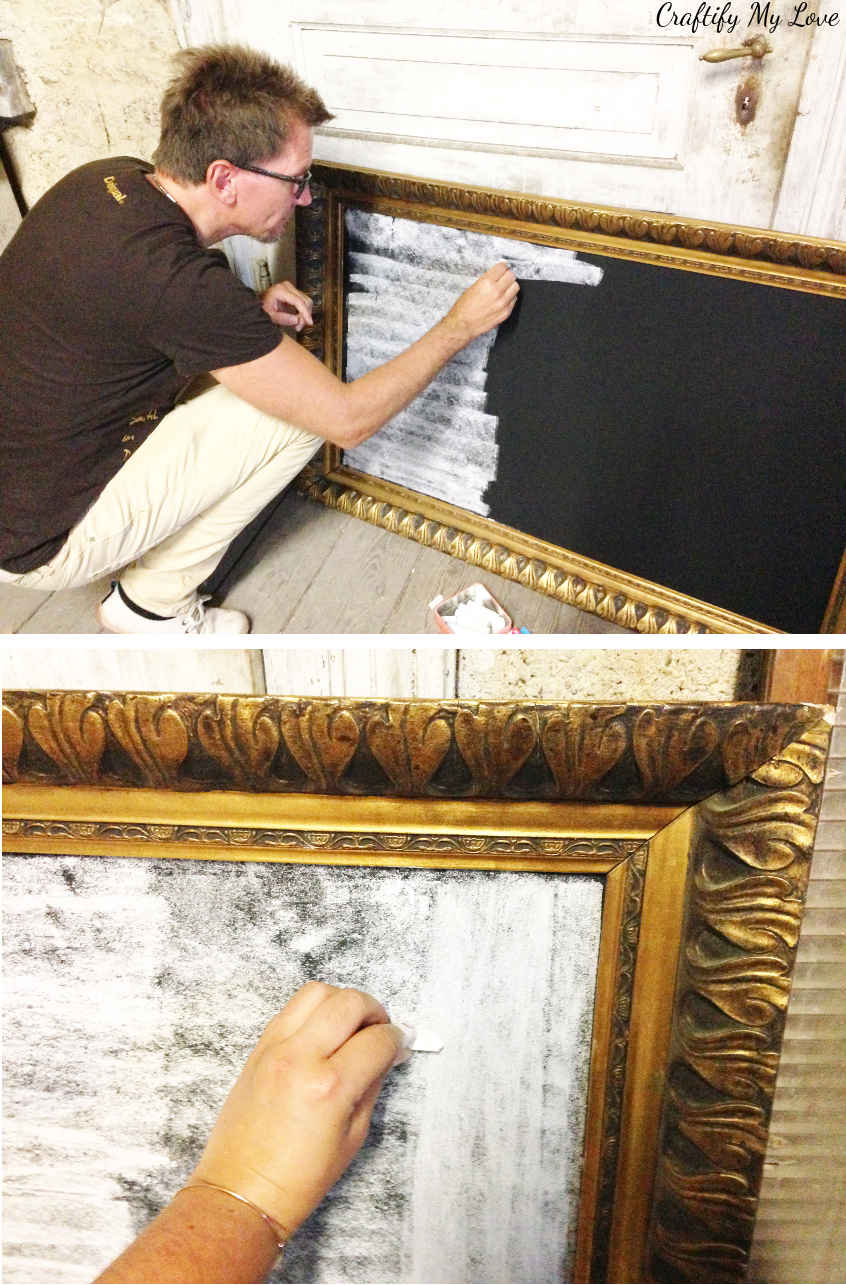
How to Break In a New DIY Chalkboard
OK, so here we are!
I am sharing with you today THE MUST DO before you start writing on a new chalkboard!
If you don’t season a new chalkboard you will end up with a permanent shadow of what you have been writing on your board. You will NEVER get this shadow removed unless you paint all over it with yet more chalkboard paint. Ask me how I know this, lol.
How to Season a New Chalkboard
- If your chalkboard is dusty or wet fix that with a clean dry cloth.
- You will grab a piece of white chalk (the thicker, the easier) and will work it horizontally (from left to right) over the entire writing surface using the wide side of the chalk.
- After everything is covered in chalk. Repeat this step vertically (from top to bottom).
- Beware of those awful sounds that your fingernails will make when you happen to scrape them over the chalkboard. Argh!
- You will want to make sure that the chalk is worked evenly into the surface at all places. Why? This way all the little nooks & crannies, dips & bumps will have met chalk in their life on the same occasion and thus won’t be clingy when they meet chalk again aka when you write your first saying or draw your first graphics on it. Does this little metaphor make any sence to you? I sure hope it does ?
- Clean off the chalk (I used a damp cloth) and your new DIY chalkboard is ready to go.
Did you know that I took a handlettering class and am still practicing my skills? I am sharing a fun little paper craft I made from all those handlettering practice sheets HERE. As soon as I am braving up to write on a ginormous chalkboard instead of a sheet of paper I’ll be happy handlettering away on my new antique DIY chalkboard. Take a look at all the inspiration on this Pinterest board.
Do you have a chalkboard at home? What is written on it at the moment?
Love,

PS: Don’t forget to PIN this to Pinterest.
And now for more thrifty goodness!
I love this Habiba! The detailing on that frame is absolutely gorgeous. Great job 🙂
Thank you , Angela. It was a wonderful treasure to find.
Prettiest chalkboard ever! I love your kitchen too!
Thank you, Emy. I feel very at peace in my kitchen.
I LOVE that frame!!! absolutely gorgeous and everyone loves a good chalkboard 😉
I know! I was thinking to not share the diy tutorial as there are already so many out there. But that frame, though. It was a must ?
Oh, I love me a good chalkboard!!
Same here. I haven’t had such a big one, though. Perfect addition.
I love this makeover, I paid A LOT of money for a chalkboard this size, now I’m kind of kicking myself for not doing something like this, lol! And thanks for adding the info about seasoning the chalkboard, a lot of people don’t know you’re supposed to do this. Great makeover!!
Thank you, Molly. I’m sure your store bought chalkboard gave you a lot of good vibes so far. But I see where you re coming from. We creators can’t do everything, though, there simply not enough time. Don’t be too hard on yourself.
These old frames make the best projects! I love how you repurposed it into a huge chalkboard
They do, right? I was so lucky to have found it.
This is fantastic! I have a DIY Chalkboard like this and I love it! It’s also in my kitchen and I write the weekly events on it. Its so helpful and I love the look of it! Your frame is gorgeous!
Thank you, Jenny. I think I should use it for organising our family life, too, until I have acquired the skills for nice handlettering.
Gorgeous chalkboard! I also learned the hard way that you need to season new chalkboards lol!
I think we all have, Amanda. It’s weired, they could just write a little note of precaution on store bought ones, right?
I love this chalkboard. That frame is amazing! Your kitchen is looking great too!
Thank you, Heather. I enjoy looking at my chalk board even though it didn’t make it up on the wall just yet.
Oh, boy, had no idea about seasoning or preparing a new chalk board. I wonder if I can do that now that I have used mine once or twice? Would love to make one of these chalk boards out of the frames I was given from my mom when we moved her over the holidays. Have them in a drawer but not for long!! Going to put your tutorial to good use.
That is so wonderful to read, Leslie. I would definitely give the seasoning part a try even now, after you’ve used yours already. Maybe it works. Or at least lessens the shadows that are already there. Repurposing your moms frames sounds like a wonderful idea! You could turn one into a chalk board and one into a pin board using a foamy material and some fabric on top. I have pics but no tutorial up on the blog just yet. Let me know if you want to know more.
I love chalkboards and big frames are perfect for them. One can’t have enough at home, right? Your kitchen is lovely, by the way
You are so very right, Pili! Thank you for your lovely note.
This is one of my favourite ways to upcycle old picture frames! I have sooo many chalkboards lying around because of it LOL. This turned out awesome!
It is a wonderful way to rescue old frames. I need to finally find the perfect saying to go up on that big one.